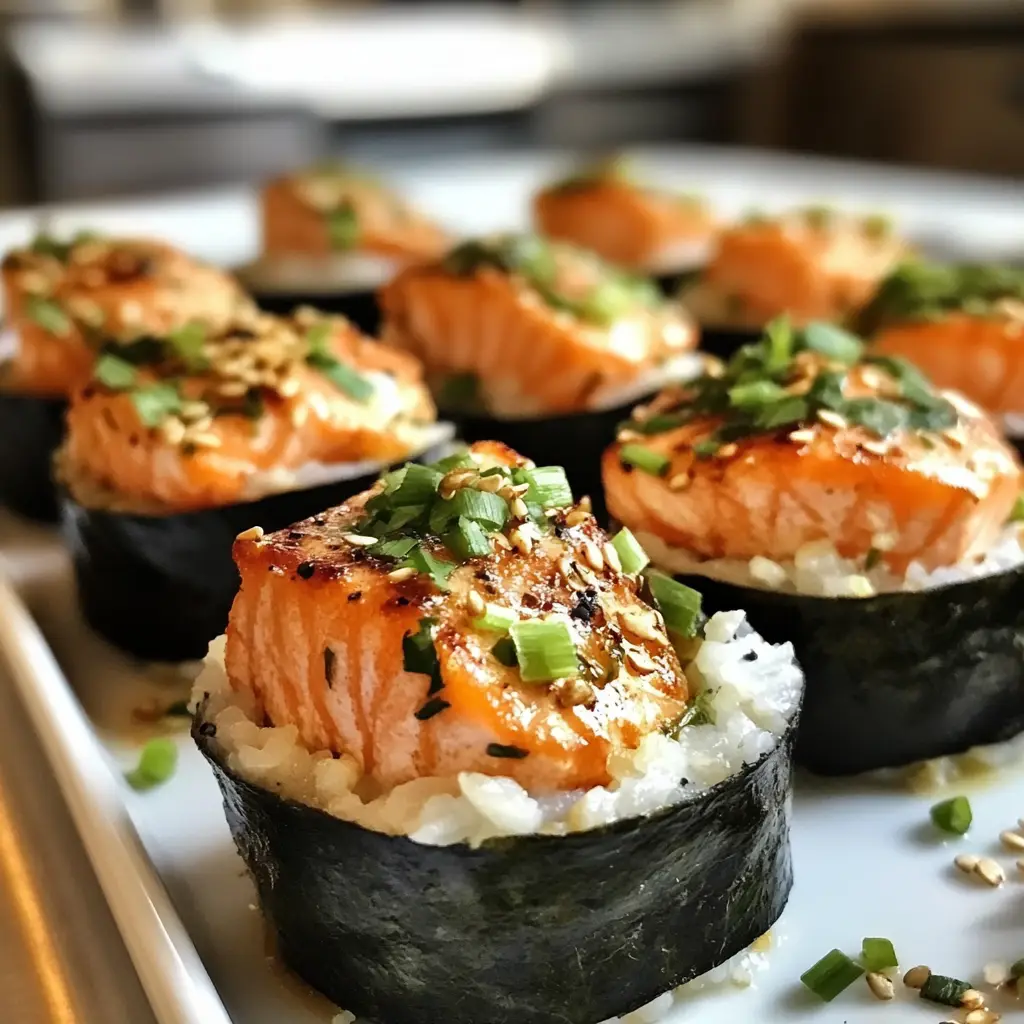
Introduction to Baked Salmon Sushi Cups
As a busy mom, I know how challenging it can be to whip up something delicious and impressive in the kitchen. That’s why I absolutely adore these Baked Salmon Sushi Cups! They’re not just a fun twist on traditional sushi; they’re also a quick solution for those hectic weeknights when you want to serve something special without spending hours in the kitchen. Imagine crispy rice cups filled with savory salmon, creamy avocado, and a hint of soy sauce. Trust me, your family will be raving about these delightful bites, and you’ll feel like a culinary rockstar!
Why You’ll Love This Baked Salmon Sushi Cups
These Baked Salmon Sushi Cups are a game-changer for busy families! They’re incredibly easy to make, taking just about 50 minutes from start to finish. The taste? Oh, it’s a delightful explosion of flavors that will make your taste buds dance! Plus, they’re versatile enough to please even the pickiest eaters. Whether it’s a casual weeknight dinner or a gathering with friends, these cups are sure to impress!
Ingredients for Baked Salmon Sushi Cups
Gathering the right ingredients is key to making these Baked Salmon Sushi Cups a success. Here’s what you’ll need:
- Sushi Rice: This short-grain rice is sticky and perfect for forming those delightful cups. It’s the heart of the dish!
- Water: Essential for cooking the rice to the perfect texture. The right water-to-rice ratio is crucial.
- Rice Vinegar: This adds a tangy flavor that balances the richness of the salmon. It’s a must for authentic sushi taste.
- Sugar: Just a touch to enhance the flavor of the rice. It helps create that lovely sushi rice sweetness.
- Salt: A pinch to season the rice, bringing all the flavors together beautifully.
- Salmon Fillet: Cooked and flaked, this is the star of the show! You can use fresh or leftover salmon for convenience.
- Avocado: Creamy and rich, it adds a wonderful texture and flavor contrast to the salmon.
- Green Onions: Chopped for a fresh, mild onion flavor that brightens up the filling.
- Mayonnaise: This adds creaminess to the salmon mixture. You can use regular or light, depending on your preference.
- Soy Sauce: A splash for that umami kick! It enhances the overall flavor profile of the filling.
- Sesame Oil: Just a drizzle adds a nutty aroma and flavor that’s simply irresistible.
- Seaweed Sheets: Cut into small squares, these are perfect for garnishing and adding a touch of authenticity.
For those who like a little heat, consider adding sriracha to the salmon mixture. And if you’re feeling adventurous, feel free to customize the filling with your favorite sushi ingredients! You can find the exact quantities for each ingredient at the bottom of the article, ready for printing.
How to Make Baked Salmon Sushi Cups
Now that you have all your ingredients ready, let’s dive into the fun part—making these Baked Salmon Sushi Cups! Follow these simple steps, and you’ll have a delicious dish that’s sure to impress.
Step 1: Preheat the Oven
First things first, preheat your oven to 375°F (190°C). Preheating is crucial because it ensures even cooking. You want those rice cups to bake perfectly, turning golden brown and crispy!
Step 2: Rinse the Sushi Rice
Next, rinse the sushi rice under cold water. This step is essential for removing excess starch. Rinsing helps achieve that perfect sticky texture, making it easier to form the rice cups later.
Step 3: Cook the Sushi Rice
In a pot, combine the rinsed rice and water. Bring it to a boil, then reduce the heat, cover, and let it simmer for about 20 minutes. This method allows the rice to absorb all the water, resulting in fluffy, tender rice.
Step 4: Season the Rice
Once the rice is cooked, it’s time to season it! In a small bowl, mix rice vinegar, sugar, and salt until dissolved. Stir this mixture into the warm rice. This step is crucial as it adds flavor and gives the rice that classic sushi taste.
Step 5: Form the Rice Cups
Now, let’s shape those rice cups! Once the rice has cooled slightly, press it into muffin tins. Make sure to pack it tightly to hold its shape. This is where the magic happens—creating those adorable little cups!
Step 6: Bake the Rice Cups
Place the muffin tin in the preheated oven and bake for 15-20 minutes. Keep an eye on them! You’ll know they’re done when they turn golden brown and crispy around the edges. The aroma will be heavenly!
Step 7: Prepare the Salmon Filling
While the rice cups are baking, let’s prepare the filling. In a bowl, combine the flaked salmon, diced avocado, chopped green onions, mayonnaise, soy sauce, and sesame oil. Mix everything gently until well combined. This filling is packed with flavor!
Step 8: Fill the Rice Cups
Once the rice cups are out of the oven and slightly cooled, it’s time to fill them! Spoon the salmon mixture into each rice cup, generously filling them to the brim. Don’t be shy—these cups are meant to be deliciously overflowing!
Step 9: Garnish and Serve
Finally, garnish your Baked Salmon Sushi Cups with small squares of seaweed. This adds a lovely touch and enhances the sushi experience. Serve them warm, and watch your family and friends enjoy every bite!
Tips for Success
- Make sure to rinse the sushi rice thoroughly for the best texture.
- Pack the rice tightly in the muffin tins to ensure the cups hold their shape.
- Experiment with different fillings like crab or veggies for variety.
- For a crispy finish, keep an eye on the baking time.
- Let the rice cups cool slightly before filling to avoid sogginess.
Equipment Needed
- Muffin Tin: Essential for shaping the rice cups. If you don’t have one, use a silicone mold for easy removal.
- <strong<Pot: For cooking the sushi rice. A medium-sized saucepan works perfectly.
- Mixing Bowls: Use these for combining the salmon filling. Any size will do!
- Measuring Cups and Spoons: Handy for accurate ingredient measurements.
Variations
- Spicy Tuna Cups: Swap the salmon for spicy tuna by mixing raw tuna with sriracha and mayonnaise for a kick!
- Vegetarian Option: Replace the salmon with marinated tofu or a mix of sautéed vegetables for a delicious plant-based version.
- Quinoa Cups: Use quinoa instead of sushi rice for a gluten-free and protein-packed alternative.
- Herbed Cream Cheese: Add a dollop of herbed cream cheese to the filling for a creamy twist that complements the salmon.
- Fruit Salsa: Top the cups with a fresh fruit salsa made from mango or pineapple for a sweet contrast to the savory filling.
Serving Suggestions
- Pair your Baked Salmon Sushi Cups with a light cucumber salad for a refreshing crunch.
- Serve alongside a chilled glass of green tea or sparkling water with lemon for a delightful drink.
- For a beautiful presentation, arrange the cups on a platter with colorful garnishes like radish slices or edible flowers.
FAQs about Baked Salmon Sushi Cups
Can I use raw salmon instead of cooked?
While I recommend using cooked salmon for safety, you can use sushi-grade raw salmon if you prefer a more traditional sushi experience. Just ensure it’s fresh and handled properly!
How do I store leftovers?
Store any leftover Baked Salmon Sushi Cups in an airtight container in the fridge. They’ll stay fresh for up to 2 days. Just reheat them in the oven for a few minutes before serving!
Can I make these cups ahead of time?
Absolutely! You can prepare the rice cups and filling in advance. Just assemble and bake them right before serving for the best texture and flavor.
What can I substitute for sushi rice?
If you can’t find sushi rice, short-grain rice or even quinoa can work as alternatives. Just keep in mind that the texture will differ slightly.
Are Baked Salmon Sushi Cups gluten-free?
Yes! As long as you use gluten-free soy sauce, these Baked Salmon Sushi Cups are a delicious gluten-free option for everyone to enjoy.
Final Thoughts
Making Baked Salmon Sushi Cups is more than just cooking; it’s about creating joyful moments in the kitchen. The delightful aroma wafting through your home as they bake is simply irresistible. Each bite is a burst of flavor, combining the crispy rice with the creamy salmon filling. Whether you’re serving them at a family dinner or a gathering with friends, these cups are sure to spark smiles and compliments. I love how they bring everyone together, making mealtime feel special. So roll up your sleeves, and let’s create some delicious memories with these scrumptious sushi cups!
PrintBaked Salmon Sushi Cups: A Delicious Twist on Sushi!
- Total Time: 50 minutes
- Yield: 12 cups 1x
- Diet: Gluten Free
Description
Baked Salmon Sushi Cups are a delightful and innovative take on traditional sushi, combining the flavors of salmon with a crispy cup made from sushi rice.
Ingredients
- 2 cups sushi rice
- 2 1/2 cups water
- 1/4 cup rice vinegar
- 2 tablespoons sugar
- 1 teaspoon salt
- 1 pound salmon fillet, cooked and flaked
- 1 avocado, diced
- 1/4 cup green onions, chopped
- 1/4 cup mayonnaise
- 1 tablespoon soy sauce
- 1 teaspoon sesame oil
- Seaweed sheets, cut into small squares
Instructions
- Preheat the oven to 375°F (190°C).
- Rinse the sushi rice under cold water until the water runs clear.
- In a pot, combine the rinsed rice and water, and bring to a boil. Reduce heat, cover, and simmer for 20 minutes.
- In a small bowl, mix rice vinegar, sugar, and salt until dissolved. Stir into the cooked rice and let it cool.
- Once cooled, press the rice into muffin tins to form cups.
- Bake the rice cups in the preheated oven for 15-20 minutes until golden brown.
- In a bowl, combine flaked salmon, avocado, green onions, mayonnaise, soy sauce, and sesame oil.
- Remove the rice cups from the oven and let them cool slightly.
- Fill each rice cup with the salmon mixture.
- Garnish with seaweed squares and serve warm.
Notes
- For a spicier kick, add sriracha to the salmon mixture.
- These cups can be made ahead of time and reheated before serving.
- Feel free to customize the filling with your favorite sushi ingredients.
- Prep Time: 30 minutes
- Cook Time: 20 minutes
- Category: Appetizer
- Method: Baking
- Cuisine: Japanese
Nutrition
- Serving Size: 1 cup
- Calories: 250
- Sugar: 1g
- Sodium: 300mg
- Fat: 10g
- Saturated Fat: 2g
- Unsaturated Fat: 6g
- Trans Fat: 0g
- Carbohydrates: 30g
- Fiber: 2g
- Protein: 15g
- Cholesterol: 50mg
Keywords: Baked Salmon Sushi Cups, Sushi, Salmon, Appetizer, Japanese Cuisine