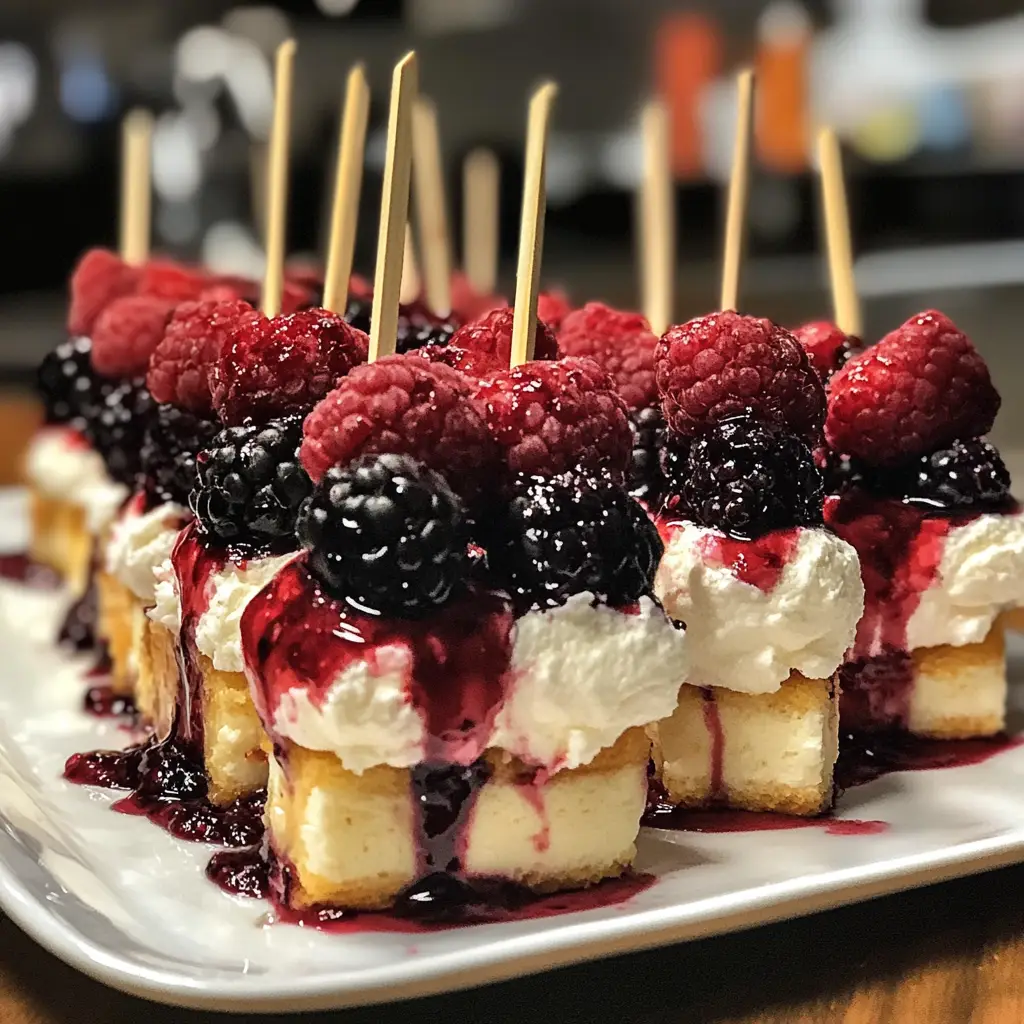
Introduction to Berry Cheesecake Skewers
As a passionate home cook, I find joy in creating delightful treats that not only taste amazing but also look stunning. One of my favorite recipes to whip up is Berry Cheesecake Skewers. These little bites of heaven are perfect for any occasion, whether it’s a summer picnic, a birthday party, or just a cozy night in with family. The vibrant colors of the berries combined with the creamy cheesecake filling create a visual feast that’s hard to resist!
Let me take you back to a sunny afternoon when I first stumbled upon this recipe. I was hosting a small gathering for friends, and I wanted to impress them with something unique. I had some fresh strawberries, blueberries, and raspberries sitting in my fridge, and the idea of skewering them with a luscious cheesecake mixture popped into my head. The result? A hit! Everyone loved the combination of flavors and textures, and I knew I had to share this gem with others.
What I adore about these skewers is their versatility. You can customize them with your favorite berries or even add a drizzle of chocolate for an extra touch of indulgence. Plus, they’re easy to make, which means you can spend less time in the kitchen and more time enjoying the company of your loved ones. So, grab your skewers, and let’s dive into the delicious world of Berry Cheesecake Skewers!
Ingredients for Berry Cheesecake Skewers
Before we embark on our culinary adventure, let’s gather all the ingredients we need for these delightful Berry Cheesecake Skewers. I always believe that the quality of ingredients can make or break a dish, so I recommend using the freshest berries you can find. Whether you pick them from your garden or buy them from a local farmer’s market, fresh ingredients will elevate your skewers to a whole new level!
Main Ingredients
- 8 oz (225 g) cream cheese, softened
- 1/4 cup (50 g) granulated sugar
- 1 tsp vanilla extract
- 1 cup (240 ml) heavy whipping cream
- 1 cup (150 g) strawberries, hulled and halved
- 1 cup (150 g) blueberries
- 1 cup (150 g) raspberries
- Wooden or metal skewers (about 6-8 inches long)
When it comes to cream cheese, I prefer using full-fat for that rich and creamy texture. If you’re looking for a lighter option, you can use reduced-fat cream cheese, but the flavor might be slightly different. As for the sugar, feel free to adjust the sweetness to your liking. Sometimes, I even use honey or maple syrup for a natural twist!
Optional Add-ons
- Chocolate drizzle (melted chocolate or chocolate syrup)
- Crushed graham crackers for a crunchy topping
- Mint leaves for garnish
- Other berries like blackberries or cherries
These optional add-ons can take your Berry Cheesecake Skewers to the next level! A drizzle of chocolate adds a touch of decadence, while crushed graham crackers give a nod to traditional cheesecake crust. And don’t forget about the mint leaves! They not only look beautiful but also add a refreshing burst of flavor. Feel free to mix and match your favorite berries, too. The more colorful, the better!
How to Prepare Berry Cheesecake Skewers
Now that we have all our ingredients ready, it’s time to dive into the fun part—preparing our Berry Cheesecake Skewers! I love this part because it’s where the magic happens. Follow these simple steps, and you’ll have a delightful treat that will impress everyone!
Step 1: Prepare the Cheesecake Mixture
First things first, let’s whip up that creamy cheesecake filling. In a mixing bowl, combine the softened cream cheese, granulated sugar, and vanilla extract. Using an electric mixer, beat the mixture until it’s smooth and creamy. Then, in a separate bowl, whip the heavy cream until stiff peaks form. Gently fold the whipped cream into the cream cheese mixture until everything is well combined. This step is crucial for achieving that light and fluffy texture!
Tips for Step 1
- Make sure your cream cheese is at room temperature. This helps it blend smoothly without lumps.
- When folding in the whipped cream, be gentle! You want to keep that airy texture.
- If you want to add a twist, consider mixing in some lemon zest for a zesty kick!
Step 2: Assemble the Skewers
Now comes the fun part—assembling the skewers! Grab your wooden or metal skewers and start by threading a berry onto the skewer. I usually begin with a strawberry, followed by a generous scoop of the cheesecake mixture, and then a blueberry. Repeat this pattern until the skewer is filled, leaving a little space at the end for easy handling. You can mix and match the berries as you go, creating a colorful masterpiece!
Tips for Step 2
- Don’t overcrowd the skewers. Leave enough space between the berries and cheesecake for a beautiful presentation.
- For a fun twist, try alternating the order of the berries. It adds visual interest!
- If you’re using metal skewers, be careful—they can get hot if left in the sun!
Step 3: Chill the Skewers
Once your skewers are assembled, it’s time to let them chill. Place the skewers on a plate or a baking sheet and cover them with plastic wrap. Pop them in the refrigerator for at least 30 minutes. This step allows the cheesecake mixture to firm up a bit, making it easier to enjoy without making a mess!
Tips for Step 3
- Chilling the skewers not only helps with texture but also enhances the flavors. The longer they chill, the better they taste!
- If you’re in a hurry, even 15 minutes in the fridge can make a difference.
- For an extra touch, sprinkle some crushed graham crackers on top just before serving!
Equipment Needed for Berry Cheesecake Skewers
Before we get started, let’s make sure we have all the right tools for our Berry Cheesecake Skewers. Having the right equipment can make the process smoother and more enjoyable. Here’s what you’ll need:
- Mixing Bowls: A couple of medium-sized mixing bowls will do the trick. I love using glass bowls because they’re easy to clean and you can see the mixture as you whip it up!
- Electric Mixer: This is essential for achieving that creamy cheesecake filling. If you don’t have one, a whisk will work, but it’ll take a bit more elbow grease!
- Wooden or Metal Skewers: You’ll need these to assemble your delicious skewers. If you’re in a pinch, you can even use toothpicks for mini versions!
- Plastic Wrap: This is perfect for covering the skewers while they chill in the fridge. It keeps them fresh and prevents any odors from the fridge from sneaking in.
- Serving Platter: Once your skewers are ready, a beautiful platter will showcase your creation. I like to use a colorful plate to make the berries pop!
With these tools in hand, you’re all set to create your Berry Cheesecake Skewers. Remember, cooking is all about having fun, so don’t stress if you don’t have the exact equipment. Get creative and make it work!
Variations of Berry Cheesecake Skewers
One of the things I love most about Berry Cheesecake Skewers is their adaptability. You can easily switch things up to suit your taste or the season. Here are a few fun variations that I’ve tried and absolutely adored!
- Tropical Twist: Swap out the berries for tropical fruits like pineapple, mango, and kiwi. The bright colors and sweet flavors will transport you to a sunny beach!
- Chocolate Lovers: Drizzle melted chocolate over the assembled skewers or use chocolate-covered strawberries instead of fresh ones. It’s a decadent treat that chocolate lovers will devour!
- Nutty Delight: Add a sprinkle of chopped nuts, like almonds or pistachios, on top of the cheesecake mixture for a delightful crunch. It adds texture and a nutty flavor that complements the sweetness.
- Cheesecake Flavors: Experiment with different cheesecake flavors by adding ingredients like lemon zest, cocoa powder, or even pumpkin puree to the cheesecake mixture. Each variation brings a unique twist!
These variations not only keep things exciting but also allow you to cater to different preferences. Whether you’re hosting a gathering or just treating yourself, feel free to get creative with your Berry Cheesecake Skewers!
Cooking Notes for Berry Cheesecake Skewers
As I dive into the world of Berry Cheesecake Skewers, I’ve learned a few cooking notes that can make your experience even better. These little tips can help you avoid common pitfalls and ensure your skewers turn out perfectly every time!
- Freshness is Key: Always use the freshest berries you can find. Not only do they taste better, but they also look more vibrant on your skewers. If you can, pick them the same day you plan to make your skewers!
- Room Temperature Ingredients: Make sure your cream cheese is softened to room temperature before mixing. This helps create a smooth and creamy filling without any lumps. Trust me, it makes a world of difference!
- Chill Time: Don’t skip the chilling step! Allowing the skewers to chill for at least 30 minutes helps the cheesecake mixture firm up, making them easier to eat and enhancing the flavors.
- Presentation Matters: When serving, arrange your skewers in a fun and colorful way. A beautiful presentation can elevate the experience and make your guests feel special!
- Storage Tips: If you have leftovers (which is rare!), store them in an airtight container in the fridge. They’ll stay fresh for a couple of days, but I recommend enjoying them as soon as possible for the best taste!
With these cooking notes in mind, you’re well on your way to creating stunning and delicious Berry Cheesecake Skewers. Happy cooking!
Serving Suggestions for Berry Cheesecake Skewers
When it comes to serving my Berry Cheesecake Skewers, I love to get a little creative! Presentation is key, and these skewers are as much a feast for the eyes as they are for the taste buds. Here are some of my favorite serving suggestions that will make your skewers shine:
- On a Colorful Platter: Arrange the skewers on a vibrant serving platter. I often use a bright blue or yellow plate to make the colors of the berries pop. It’s like a rainbow on a plate!
- With Dipping Sauces: Serve the skewers with a side of chocolate sauce or a berry coulis for dipping. It adds an interactive element to the dessert, and who doesn’t love a little extra indulgence?
- Garnished with Fresh Mint: A sprinkle of fresh mint leaves not only adds a pop of color but also a refreshing aroma. It’s like a little garden on your plate!
- As Part of a Dessert Table: If you’re hosting a gathering, include these skewers as part of a dessert table. Pair them with other treats like mini cupcakes or fruit tarts for a delightful spread.
- Individual Servings: For a more elegant touch, serve each skewer in a small glass or jar. It’s a charming way to present them, and guests can easily grab their own!
These serving suggestions not only enhance the visual appeal of your Berry Cheesecake Skewers but also create a delightful experience for your guests. Remember, the joy of cooking is not just in the taste but also in the presentation and the memories you create around the table!
Tips for Perfect Berry Cheesecake Skewers
Creating the perfect Berry Cheesecake Skewers is all about the little details. Over the years, I’ve gathered some handy tips that can elevate your skewers from good to absolutely fantastic. Here’s what I’ve learned:
- Choose the Right Berries: Opt for berries that are firm and vibrant. Soft or overripe berries can make your skewers mushy. I always give them a gentle squeeze to check for freshness!
- Balance the Flavors: If you’re using sweet berries, consider adding a touch of tartness to the cheesecake mixture. A squeeze of lemon juice can brighten the flavors and create a delightful contrast.
- Don’t Rush the Chilling: Patience is key! Allowing your skewers to chill for a full 30 minutes (or longer) helps the flavors meld together beautifully. Trust me, it’s worth the wait!
- Experiment with Textures: For added crunch, sprinkle some crushed graham crackers or nuts on top of the cheesecake mixture before chilling. It adds a delightful texture that complements the creaminess.
- Make Ahead: If you’re planning for a gathering, you can prepare the skewers a few hours in advance. Just keep them covered in the fridge until it’s time to serve. This way, you can enjoy the party without being stuck in the kitchen!
With these tips in your back pocket, you’re ready to create stunning and delicious Berry Cheesecake Skewers that will impress everyone. Happy cooking!
Breakdown of Time for Berry Cheesecake Skewers
As a home cook, I know that time management is key in the kitchen. When it comes to making Berry Cheesecake Skewers, it’s all about planning your time wisely. Here’s a quick breakdown of how long each step will take, so you can enjoy the process without feeling rushed!
- Prep Time: Approximately 20 minutes. This includes gathering your ingredients, preparing the cheesecake mixture, and assembling the skewers. It’s a fun and creative time, so don’t rush it!
- Chilling Time: At least 30 minutes. This step is crucial for allowing the cheesecake mixture to firm up. If you can, let them chill for an hour or more for the best flavor and texture.
- Total Time: About 50 minutes (not including optional chilling time). In just under an hour, you can have these delightful skewers ready to impress your family and friends!
With this time breakdown, you can easily fit the preparation of Berry Cheesecake Skewers into your day. Whether you’re planning for a special occasion or just a sweet treat for yourself, you’ll find that the time spent is well worth the delicious outcome!
Nutritional Information for Berry Cheesecake Skewers
As a passionate home cook, I always keep an eye on the nutritional aspects of my creations. While Berry Cheesecake Skewers are a delightful treat, they can also be enjoyed in moderation as part of a balanced diet. Here’s a quick look at the nutritional information for one skewer, assuming you use the main ingredients listed:
- Calories: Approximately 150 calories
- Protein: 3 grams
- Fat: 10 grams
- Carbohydrates: 12 grams
- Sugar: 8 grams
- Fiber: 1 gram
These numbers can vary based on the specific ingredients you choose, especially if you opt for lighter cream cheese or adjust the sugar content. The berries themselves are packed with vitamins, antioxidants, and fiber, making them a nutritious addition to your dessert. So, while you indulge in these Berry Cheesecake Skewers, you can feel good knowing you’re enjoying a treat that also offers some health benefits!
Frequently Asked Questions about Berry Cheesecake Skewers
As I’ve shared my love for Berry Cheesecake Skewers, I often get questions from fellow home cooks eager to try this delightful treat. I love answering these queries because it shows just how much excitement there is around this recipe! Here are some of the most frequently asked questions, along with my personal insights:
Can I use frozen berries instead of fresh ones?
Absolutely! While fresh berries are my go-to for their vibrant flavor and texture, frozen berries can work in a pinch. Just make sure to thaw them and drain any excess liquid before using them in your skewers. This way, you won’t end up with a soggy cheesecake mixture!
How long can I store the skewers?
If you have any leftovers (which is rare in my kitchen!), you can store the Berry Cheesecake Skewers in an airtight container in the fridge for up to two days. However, they’re best enjoyed fresh, so I recommend sharing them with friends and family right away!
Can I make these skewers ahead of time?
Yes, you can! I often prepare the cheesecake mixture and assemble the skewers a few hours before serving. Just keep them covered in the fridge until it’s time to enjoy. This way, you can spend more time with your guests and less time in the kitchen!
What can I substitute for cream cheese?
If you’re looking for a lighter option, you can use Greek yogurt or mascarpone cheese as a substitute for cream cheese. Keep in mind that the flavor and texture will change slightly, but it can still be delicious! Just make sure to adjust the sweetness accordingly.
Can I make mini versions of these skewers?
Definitely! Mini skewers are a fun idea, especially for parties or gatherings. You can use toothpicks instead of regular skewers and cut the berries into smaller pieces. They make for adorable bite-sized treats that everyone will love!
These questions reflect the curiosity and creativity that come with making Berry Cheesecake Skewers. I hope my answers inspire you to try this recipe and make it your own. Remember, cooking is all about experimenting and having fun, so don’t hesitate to ask your own questions as you embark on this delicious journey!
Conclusion on Berry Cheesecake Skewers
In wrapping up my delightful journey with Berry Cheesecake Skewers, I can’t help but smile at how these little treats bring joy to any gathering. They’re not just a feast for the eyes; they’re a celebration of flavors and textures that everyone can enjoy. The creamy cheesecake filling paired with the freshness of the berries creates a harmonious balance that’s simply irresistible.
What I love most about these skewers is their versatility. Whether you’re hosting a summer barbecue, a birthday bash, or just treating yourself on a quiet evening, they fit right in. Plus, they’re easy to make, allowing you to spend more time with your loved ones and less time in the kitchen. With endless variations and serving options, you can truly make them your own!
So, the next time you’re looking for a sweet treat that’s sure to impress, remember these Berry Cheesecake Skewers. They’re not just a dessert; they’re a delightful experience that brings people together. Happy cooking, and may your kitchen always be filled with love and laughter!