Introduction to Vanilla Bean Valentine Cupcakes
Ah, Valentine’s Day! A time for love, laughter, and, of course, delicious treats. If you’re like me, you want to impress your loved ones without spending hours in the kitchen. That’s where these Vanilla Bean Valentine Cupcakes come in! They’re fluffy, flavorful, and oh-so-easy to whip up. Perfect for busy moms and professionals, these cupcakes are a quick solution for a sweet celebration. Whether you’re baking for a special someone or treating yourself, these delightful cupcakes will surely bring smiles all around. Let’s dive into this delightful recipe that’s bound to make your heart flutter!
Why You’ll Love This Vanilla Bean Valentine Cupcakes
These Vanilla Bean Valentine Cupcakes are a dream come true for anyone short on time but big on flavor. They come together in just 40 minutes, making them perfect for last-minute baking. The rich, aromatic vanilla bean paste elevates the taste, ensuring every bite is a delight. Plus, they’re versatile enough to please even the pickiest eaters. Trust me, these cupcakes will make your Valentine’s Day extra special without the stress!
Ingredients for Vanilla Bean Valentine Cupcakes
Let’s gather our ingredients for these delightful Vanilla Bean Valentine Cupcakes. Each component plays a vital role in creating that fluffy texture and rich flavor. Here’s what you’ll need:
- All-purpose flour: The backbone of our cupcakes, providing structure and lightness.
- Granulated sugar: Sweetens the batter and helps create that lovely golden crust.
- Unsalted butter: Adds richness and moisture. Make sure it’s softened for easy creaming!
- Large eggs: They bind the ingredients together and contribute to the cupcakes’ fluffiness.
- Milk: This adds moisture and helps create a tender crumb. You can use whole or low-fat milk.
- Vanilla bean paste: The star of the show! It infuses a deep, aromatic vanilla flavor and those beautiful specks.
- Baking powder: Our leavening agent, ensuring the cupcakes rise beautifully.
- Salt: Just a pinch enhances all the flavors and balances the sweetness.
For those looking to switch things up, consider using almond flour for a nutty twist or coconut milk for a dairy-free option. You can find all the exact measurements at the bottom of the article, ready for printing. Happy baking!
How to Make Vanilla Bean Valentine Cupcakes
Now that we have our ingredients ready, let’s dive into the fun part: making these Vanilla Bean Valentine Cupcakes! Follow these simple steps, and you’ll have a batch of delightful cupcakes in no time.
Step 1: Preheat the Oven
First things first, preheat your oven to 350°F (175°C). This step is crucial because it ensures even baking. While the oven warms up, line your cupcake pan with liners. This not only makes for easy cleanup but also adds a lovely touch to your presentation.
Step 2: Cream Butter and Sugar
In a large bowl, cream together the softened butter and granulated sugar until the mixture is light and fluffy. This process is essential for creating a tender texture in your cupcakes. The air you incorporate during creaming will help them rise beautifully!
Step 3: Add Eggs and Vanilla Bean Paste
Next, add the eggs one at a time, mixing well after each addition. Eggs are the glue that holds everything together, giving your cupcakes structure. Then, stir in the star ingredient: vanilla bean paste. This will enhance the flavor and add those charming little specks of vanilla throughout.
Step 4: Combine Dry Ingredients
In another bowl, whisk together the all-purpose flour, baking powder, and salt. Mixing these dry ingredients separately ensures that the baking powder is evenly distributed. This step is key to achieving that perfect rise in your cupcakes!
Step 5: Mix Wet and Dry Ingredients
Now, it’s time to combine the wet and dry ingredients. Gradually add the dry mixture to the wet ingredients, alternating with the milk. Mix until just combined. Be careful not to overmix; a few lumps are perfectly fine! Overmixing can lead to dense cupcakes, and we want them light and fluffy.
Step 6: Fill Cupcake Liners
Using a scoop or spoon, fill the cupcake liners about two-thirds full with batter. This allows room for the cupcakes to rise without overflowing. Trust me, you want to avoid a cupcake volcano!
Step 7: Bake the Cupcakes
Place the cupcake pan in the preheated oven and bake for 18-20 minutes. To check for doneness, insert a toothpick into the center of a cupcake. If it comes out clean or with a few crumbs, they’re ready! If not, give them a couple more minutes.
Step 8: Cool and Frost
Once baked, remove the cupcakes from the oven and let them cool in the pan for about 5 minutes. Then, transfer them to a wire rack to cool completely. This step is important because frosting warm cupcakes can lead to a melty mess. Once cooled, feel free to frost them with your favorite cream cheese frosting or vanilla buttercream!
Tips for Success
- Always use room temperature ingredients for better mixing.
- Don’t skip the creaming step; it’s vital for fluffy cupcakes.
- Use a kitchen scale for precise measurements, especially for flour.
- Let the cupcakes cool completely before frosting to avoid melting.
- Experiment with different frostings to find your favorite flavor combination!
Equipment Needed
- Cupcake pan: A standard 12-cup pan works perfectly. If you don’t have one, use a muffin tin.
- Mixing bowls: A large bowl for wet ingredients and a medium bowl for dry ingredients.
- Electric mixer: A hand mixer is great, but a whisk will do if you’re feeling strong!
- Measuring cups and spoons: Essential for accurate ingredient measurements.
- Cooling rack: Helps cool cupcakes evenly. If you don’t have one, a plate will suffice.
Variations
- Chocolate Delight: Add 1/3 cup of cocoa powder to the dry ingredients for a rich chocolate version.
- Berry Burst: Fold in 1 cup of fresh or frozen berries, like raspberries or blueberries, for a fruity twist.
- Gluten-Free Option: Substitute all-purpose flour with a gluten-free flour blend for a gluten-free treat.
- Dairy-Free Version: Use almond milk or coconut milk and replace butter with coconut oil for a dairy-free cupcake.
- Spiced Vanilla: Add a teaspoon of cinnamon or nutmeg to the dry ingredients for a warm, spiced flavor.
Serving Suggestions
- Pair with Coffee: A warm cup of coffee or espresso complements the sweetness perfectly.
- Fresh Berries: Serve with a side of fresh strawberries or raspberries for a refreshing contrast.
- Decorative Touch: Dust with powdered sugar or add sprinkles for a festive look.
- Gift Idea: Package in a cute box for a thoughtful homemade gift.
FAQs about Vanilla Bean Valentine Cupcakes
As you embark on your baking adventure with these Vanilla Bean Valentine Cupcakes, you might have a few questions. Here are some common queries that can help you along the way:
Can I use vanilla extract instead of vanilla bean paste?
Absolutely! While vanilla bean paste adds a richer flavor and those lovely specks, pure vanilla extract works just fine. Use about 1 tablespoon of extract for a similar taste.
How can I store leftover cupcakes?
Store your cupcakes in an airtight container at room temperature for up to three days. If you frost them, it’s best to keep them in the fridge to maintain freshness.
Can I freeze these cupcakes?
Yes! You can freeze the unfrosted cupcakes for up to three months. Just make sure they’re completely cooled, then wrap them tightly in plastic wrap before placing them in a freezer bag.
What frosting pairs best with these cupcakes?
While cream cheese frosting is a classic choice, vanilla buttercream is also a delightful option. You can even try a chocolate ganache for a decadent twist!
Can I make these cupcakes ahead of time?
Definitely! You can bake the cupcakes a day in advance. Just store them properly and frost them on the day you plan to serve for the best flavor and texture.
Final Thoughts
There’s something truly magical about baking these Vanilla Bean Valentine Cupcakes. The aroma of vanilla fills your kitchen, wrapping you in warmth and nostalgia. Each fluffy bite is a reminder of love, joy, and the simple pleasures in life. Whether you’re sharing them with family, friends, or indulging solo, these cupcakes bring smiles and sweet moments. So, roll up your sleeves, embrace the joy of baking, and let these delightful treats be the highlight of your Valentine’s Day. Trust me, your heart (and taste buds) will thank you!
Print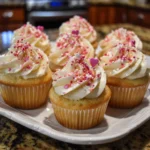
Vanilla Bean Valentine Cupcakes You’ll Love to Bake!
- Total Time: 40 minutes
- Yield: 12 cupcakes 1x
- Diet: Vegetarian
Description
Delicious and fluffy vanilla bean cupcakes perfect for Valentine’s Day celebrations.
Ingredients
- 1 1/2 cups all-purpose flour
- 1 cup granulated sugar
- 1/2 cup unsalted butter, softened
- 2 large eggs
- 1/2 cup milk
- 1 tablespoon vanilla bean paste
- 1 1/2 teaspoons baking powder
- 1/4 teaspoon salt
Instructions
- Preheat the oven to 350°F (175°C) and line a cupcake pan with liners.
- In a large bowl, cream together the butter and sugar until light and fluffy.
- Add the eggs one at a time, mixing well after each addition.
- Stir in the vanilla bean paste.
- In another bowl, whisk together the flour, baking powder, and salt.
- Gradually add the dry ingredients to the wet mixture, alternating with the milk, and mix until just combined.
- Fill the cupcake liners about 2/3 full with the batter.
- Bake for 18-20 minutes or until a toothpick inserted in the center comes out clean.
- Let the cupcakes cool completely before frosting.
Notes
- For a richer flavor, use high-quality vanilla bean paste.
- These cupcakes can be frosted with cream cheese frosting or vanilla buttercream.
- Store leftovers in an airtight container at room temperature for up to 3 days.
- Prep Time: 20 minutes
- Cook Time: 20 minutes
- Category: Dessert
- Method: Baking
- Cuisine: American
Nutrition
- Serving Size: 1 cupcake
- Calories: 200
- Sugar: 15g
- Sodium: 150mg
- Fat: 8g
- Saturated Fat: 5g
- Unsaturated Fat: 2g
- Trans Fat: 0g
- Carbohydrates: 30g
- Fiber: 0g
- Protein: 2g
- Cholesterol: 40mg
Keywords: Vanilla Bean, Cupcakes, Valentine's Day, Baking