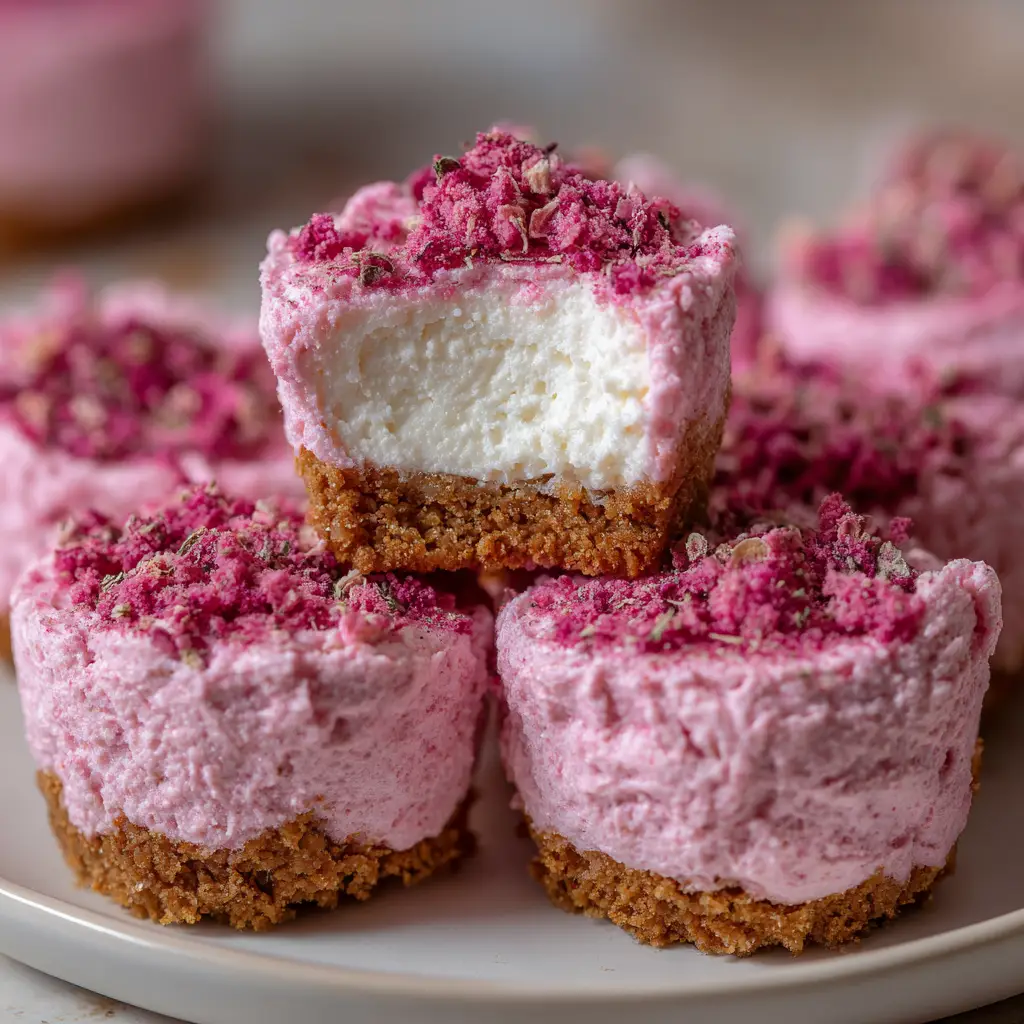
Introduction to No-Bake Pink Velvet Cheesecake Bites
Hey there, fellow dessert lovers! If you’re anything like me, you know that life can get pretty hectic. Between juggling work, family, and everything in between, finding time to whip up a delightful treat can feel impossible. That’s where these No-Bake Pink Velvet Cheesecake Bites come in! They’re not just easy to make; they’re also a feast for the eyes and the taste buds. Perfect for a quick solution on a busy day or a charming dessert to impress your loved ones, these bites are sure to bring smiles all around!
Why You’ll Love This No-Bake Pink Velvet Cheesecake Bites
These No-Bake Pink Velvet Cheesecake Bites are a dream come true for busy moms and professionals alike. They come together in just 20 minutes, leaving you with more time to enjoy life. The creamy, rich flavor of cheesecake combined with that vibrant pink hue makes them a showstopper at any gathering. Plus, they’re a hit with kids and adults, making dessert time a delightful experience for everyone!
Ingredients for No-Bake Pink Velvet Cheesecake Bites
Gathering the right ingredients is half the fun! Here’s what you’ll need to create these delightful No-Bake Pink Velvet Cheesecake Bites:
- Cream Cheese: The star of the show! Softened cream cheese gives these bites their rich, creamy texture.
- Powdered Sugar: This sweetener adds just the right amount of sweetness without the graininess of granulated sugar.
- Whipped Topping: Light and fluffy, it helps create a smooth consistency and adds a touch of airiness.
- Vanilla Extract: A splash of vanilla enhances the flavor, making every bite taste like a little piece of heaven.
- Pink Velvet Cake Mix: This is what gives our cheesecake bites that beautiful pink color and a hint of cake flavor.
- Graham Cracker Crumbs: These form the base of our bites, providing a crunchy contrast to the creamy filling.
- Melted Butter: It binds the graham cracker crumbs together, creating a delicious crust.
- Pink Food Coloring (optional): If you want to amp up the pink factor, a few drops will do the trick!
For exact measurements, check the bottom of the article where you can find everything listed for easy printing. Feel free to get creative with your ingredients! You can swap out the whipped topping for a dairy-free alternative or use a different flavored cake mix if you’re feeling adventurous.
How to Make No-Bake Pink Velvet Cheesecake Bites
Now that we have our ingredients ready, let’s dive into the fun part—making these delightful No-Bake Pink Velvet Cheesecake Bites! Follow these simple steps, and you’ll have a delicious treat in no time.
Step 1: Prepare the Cream Cheese Mixture
Start by grabbing a mixing bowl and your softened cream cheese. Using an electric mixer, beat the cream cheese until it’s smooth and creamy. This step is crucial because it sets the foundation for our cheesecake filling. Once it’s nice and fluffy, add in the powdered sugar, whipped topping, vanilla extract, and pink velvet cake mix. Mix everything together until it’s well combined. You want a luscious, creamy texture that’s just begging to be devoured!
Step 2: Add Color and Flavor
Now, let’s make it pop with color! If you want that vibrant pink hue, this is the time to add a few drops of pink food coloring. Start with a little and mix it in. You can always add more if you want a bolder shade. Just remember, a little goes a long way! Mix until the color is evenly distributed, and your cheesecake mixture looks as delightful as it tastes.
Step 3: Make the Crust
Next up, we need to create the crust. In a separate bowl, combine the graham cracker crumbs and melted butter. Stir until the crumbs are evenly coated. This mixture should feel slightly damp but crumbly. Now, take a mini muffin tin and line it with paper liners for easy removal later. Press the graham cracker mixture firmly into the bottom of each muffin cup to form a solid crust. This step adds a satisfying crunch to our creamy bites!
Step 4: Assemble the Bites
It’s time to fill those crusts! Spoon the cheesecake mixture into each muffin cup, filling them to the top. Use a spatula to smooth the tops, making them look as pretty as a picture. Don’t worry about perfection; a little rustic charm adds to their appeal! Once filled, they’re ready for the fridge.
Step 5: Chill and Serve
Now, patience is key! Place the muffin tin in the refrigerator and let the bites chill for at least 2 hours. This allows them to set perfectly. Once they’re firm, gently remove them from the muffin tin. You can serve them right away or keep them chilled until you’re ready to impress your guests. Enjoy every creamy, dreamy bite!
Tips for Success
- Make sure your cream cheese is softened for easy mixing.
- Use a rubber spatula to scrape down the sides of the bowl for even mixing.
- Chill the bites longer if you prefer a firmer texture.
- Experiment with different cake mixes for unique flavors.
- Don’t skip the paper liners; they make serving a breeze!
Equipment Needed
- Mixing Bowl: A large bowl for combining ingredients. A sturdy plastic or glass bowl works well.
- Electric Mixer: For smooth mixing. A whisk can be used, but it requires more effort.
- Mini Muffin Tin: Essential for shaping the bites. A regular muffin tin can be used for larger portions.
- Spatula: Perfect for smoothing the cheesecake mixture. A spoon can work in a pinch!
Variations
- Chocolate Drizzle: Drizzle melted chocolate over the top for an extra indulgent treat.
- Fruit Toppings: Add fresh berries or sliced fruit on top for a refreshing twist.
- Nutty Crunch: Mix in crushed nuts like pecans or almonds for added texture.
- Dairy-Free Option: Substitute cream cheese and whipped topping with dairy-free alternatives for a vegan-friendly version.
- Flavor Infusions: Experiment with different flavored cake mixes, like red velvet or lemon, for unique variations.
Serving Suggestions
- Pair with a refreshing fruit salad for a light dessert option.
- Serve alongside a scoop of vanilla ice cream for extra indulgence.
- Garnish with fresh mint leaves for a pop of color.
- Drizzle with chocolate or caramel sauce for added sweetness.
- Present on a beautiful platter for an eye-catching display.
FAQs about No-Bake Pink Velvet Cheesecake Bites
Can I make these No-Bake Pink Velvet Cheesecake Bites ahead of time?
Absolutely! These bites are perfect for making ahead. Just prepare them, chill, and store them in an airtight container in the fridge. They’ll stay fresh for up to three days, making them a great option for parties or gatherings.
What can I use instead of cream cheese?
If you’re looking for a lighter option, you can substitute cream cheese with Greek yogurt or a dairy-free cream cheese alternative. Just keep in mind that the flavor and texture may vary slightly.
How do I store leftovers?
Store any leftover No-Bake Pink Velvet Cheesecake Bites in an airtight container in the refrigerator. They’ll stay delicious for up to three days, but I doubt they’ll last that long!
Can I freeze these cheesecake bites?
Yes, you can freeze them! Just make sure to wrap each bite individually in plastic wrap and place them in a freezer-safe container. They can be frozen for up to a month. Thaw them in the fridge before serving.
What can I use instead of graham cracker crumbs?
If you’re not a fan of graham crackers, you can use crushed cookies like Oreos or vanilla wafers. They’ll add a different flavor but still create a delicious crust for your No-Bake Pink Velvet Cheesecake Bites.
Final Thoughts
Creating these No-Bake Pink Velvet Cheesecake Bites is more than just whipping up a dessert; it’s about bringing joy to your kitchen and smiles to your loved ones. The vibrant color and creamy texture make them a delightful treat for any occasion. Plus, they’re so easy to make that even the busiest of moms can find time to indulge in a little sweetness. Whether you’re celebrating a special moment or just treating yourself, these bites are sure to add a sprinkle of happiness to your day. So, roll up your sleeves and enjoy the deliciousness!
Print
No-Bake Pink Velvet Cheesecake Bites: A Delightful Treat!
- Total Time: 2 hours 20 minutes
- Yield: 24 bites 1x
- Diet: Vegetarian
Description
No-Bake Pink Velvet Cheesecake Bites are a delightful and easy-to-make dessert that combines the rich flavors of cheesecake with a vibrant pink color, perfect for any occasion.
Ingredients
- 8 oz cream cheese, softened
- 1/2 cup powdered sugar
- 1/2 cup whipped topping
- 1/2 tsp vanilla extract
- 1/4 cup pink velvet cake mix
- 1/2 cup graham cracker crumbs
- 1/4 cup melted butter
- Pink food coloring (optional)
Instructions
- In a mixing bowl, beat the softened cream cheese until smooth.
- Add the powdered sugar, whipped topping, vanilla extract, and pink velvet cake mix. Mix until well combined.
- If desired, add a few drops of pink food coloring to achieve the desired shade.
- In another bowl, combine the graham cracker crumbs and melted butter. Mix until the crumbs are evenly coated.
- Press the graham cracker mixture into the bottom of a lined mini muffin tin to form a crust.
- Fill each crust with the cheesecake mixture, smoothing the tops with a spatula.
- Chill in the refrigerator for at least 2 hours or until set.
- Remove from the muffin tin and serve chilled.
Notes
- These bites can be decorated with sprinkles or fruit for added flair.
- Store leftovers in an airtight container in the refrigerator for up to 3 days.
- Feel free to adjust the sweetness by adding more or less powdered sugar.
- Prep Time: 20 minutes
- Cook Time: 0 minutes
- Category: Dessert
- Method: No-Bake
- Cuisine: American
Nutrition
- Serving Size: 1 bite
- Calories: 120
- Sugar: 8g
- Sodium: 50mg
- Fat: 7g
- Saturated Fat: 4g
- Unsaturated Fat: 2g
- Trans Fat: 0g
- Carbohydrates: 12g
- Fiber: 0g
- Protein: 2g
- Cholesterol: 20mg
Keywords: No-Bake Pink Velvet Cheesecake Bites, cheesecake, dessert, pink velvet