Introduction to Red Velvet Cheesecake Balls
Hey there, fellow food lovers! If you’re anything like me, you know that life can get pretty hectic. Between juggling work, family, and everything in between, finding time to whip up a delightful dessert can feel like a daunting task. That’s where these Red Velvet Cheesecake Balls come in! They’re not just a treat; they’re a quick solution for those busy days when you want to impress your loved ones without spending hours in the kitchen. With their rich flavors and creamy texture, these little bites of joy are sure to bring smiles all around!
Why You’ll Love This Red Velvet Cheesecake Balls
These Red Velvet Cheesecake Balls are a game-changer for busy moms and professionals alike. They’re incredibly easy to make, requiring minimal prep time and just a few simple ingredients. Plus, the combination of rich red velvet and creamy cheesecake is simply irresistible! Whether you’re hosting a gathering or just treating yourself, these delightful bites are sure to impress and satisfy your sweet tooth without the fuss.
Ingredients for Red Velvet Cheesecake Balls
Let’s gather our ingredients for these scrumptious Red Velvet Cheesecake Balls. Each component plays a vital role in creating that perfect blend of flavors and textures. Here’s what you’ll need:
- Red velvet cake mix: This is the star of the show! It brings that signature color and flavor.
- Water: Essential for mixing the cake batter, it helps achieve the right consistency.
- Vegetable oil: This adds moisture to the cake, making it soft and tender.
- Large eggs: They act as a binding agent, giving structure to the cake.
- Cream cheese: The creamy base for our cheesecake mixture, it adds richness and tang.
- Powdered sugar: This sweetens the cream cheese, balancing the flavors perfectly.
- Vanilla extract: A splash of this adds warmth and depth to the cheesecake mixture.
- White chocolate chips: These are for dipping, creating a sweet outer layer that complements the cheesecake.
- Sprinkles (optional): For a fun and festive touch, these can brighten up your dessert!
For those looking to switch things up, consider using dark chocolate instead of white chocolate for dipping. You can find all the exact measurements at the bottom of the article, ready for printing!
How to Make Red Velvet Cheesecake Balls
Now that we have our ingredients ready, let’s dive into the fun part—making these delightful Red Velvet Cheesecake Balls! Follow these simple steps, and you’ll have a batch of sweet treats in no time.
Step 1: Preheat and Prepare
First things first, preheat your oven to 350°F (175°C). This ensures that your cake bakes evenly. While the oven warms up, grab a baking pan and lightly grease it or line it with parchment paper. This will make it easier to remove the cake later.
Step 2: Mix the Cake Batter
In a large mixing bowl, combine the red velvet cake mix, water, vegetable oil, and eggs. Use a whisk or an electric mixer to blend everything until it’s smooth and well combined. The batter should be thick and velvety, just like the name suggests!
Step 3: Bake the Cake
Pour the cake batter into your prepared baking pan. Spread it out evenly with a spatula. Now, pop it into the preheated oven and bake according to the package instructions, usually around 30 minutes. Your kitchen will soon be filled with the sweet aroma of red velvet!
Step 4: Cool the Cake
Once the cake is baked, remove it from the oven and let it cool completely in the pan. This step is crucial! If you skip it, the cake will crumble too easily when you mix it with the cheesecake filling.
Step 5: Prepare the Cheesecake Mixture
While the cake cools, let’s whip up the cheesecake mixture. In a separate bowl, beat the softened cream cheese, powdered sugar, and vanilla extract together until it’s smooth and creamy. This mixture should be rich and luscious, ready to embrace the cake!
Step 6: Combine Cake and Cheesecake Mixture
Now, crumble the cooled red velvet cake into the cream cheese mixture. Use your hands or a fork to break it apart. Mix everything together until well combined. You want a uniform texture that holds together when rolled into balls.
Step 7: Form the Balls
With your hands, take small portions of the mixture and roll them into bite-sized balls. Aim for about one inch in diameter. Place each ball on a baking sheet lined with parchment paper. This is where the magic starts to take shape!
Step 8: Chill the Balls
Once all the balls are formed, pop them in the refrigerator for at least 30 minutes. Chilling helps them firm up, making them easier to dip in chocolate later. Plus, it builds anticipation for that first bite!
Step 9: Melt the Chocolate
While the cheesecake balls chill, melt the white chocolate chips. You can do this in a microwave-safe bowl, heating in 30-second intervals, stirring in between. Alternatively, use a double boiler for a gentler melt. The chocolate should be smooth and glossy.
Step 10: Dip and Decorate
Now comes the fun part! Take each chilled cheesecake ball and dip it into the melted white chocolate. Make sure it’s fully coated, then place it back on the parchment paper. If you like, sprinkle some fun decorations on top before the chocolate sets. Let them cool until the chocolate hardens, and voilà—your Red Velvet Cheesecake Balls are ready to enjoy!
Tips for Success
- Make sure your cream cheese is softened for easy mixing.
- Use a cookie scoop for uniform ball sizes; it makes rolling easier!
- Chill the cheesecake balls longer if they feel too soft to dip.
- Experiment with different chocolate coatings, like dark or milk chocolate.
- Store leftovers in an airtight container in the fridge for up to a week.
Equipment Needed
- Baking pan: A 9×13 inch pan works well, but any similar size will do.
- Mixing bowls: Use a large bowl for the cake and a medium bowl for the cheesecake mixture.
- Whisk or electric mixer: Either will help you achieve a smooth batter.
- Parchment paper: This makes for easy cleanup and prevents sticking.
- Baking sheet: For chilling the cheesecake balls before dipping.
Variations of Red Velvet Cheesecake Balls
- Gluten-Free: Use a gluten-free red velvet cake mix to make these cheesecake balls suitable for gluten-sensitive friends and family.
- Vegan: Substitute eggs with flax eggs and use a dairy-free cream cheese alternative. Opt for vegan chocolate for dipping.
- Nutty Twist: Add crushed walnuts or pecans to the cheesecake mixture for a delightful crunch and extra flavor.
- Minty Fresh: Incorporate a few drops of peppermint extract into the cream cheese mixture for a refreshing twist.
- Chocolate Lovers: Mix in cocoa powder with the cream cheese for a richer chocolate flavor, or use chocolate cake mix instead of red velvet.
Serving Suggestions for Red Velvet Cheesecake Balls
- Pair these Red Velvet Cheesecake Balls with a scoop of vanilla ice cream for a delightful contrast.
- Serve them on a decorative platter, garnished with fresh berries for a pop of color.
- Enjoy with a cup of coffee or a glass of milk to balance the sweetness.
- For a festive touch, arrange them in a mason jar as a charming gift.
FAQs about Red Velvet Cheesecake Balls
As you embark on your journey to create these delightful Red Velvet Cheesecake Balls, you might have a few questions. Here are some common queries that can help you along the way:
Can I make these cheesecake balls ahead of time?
Absolutely! You can prepare the cheesecake balls a day in advance. Just store them in an airtight container in the refrigerator until you’re ready to serve. This makes them a perfect make-ahead treat for busy days!
What can I use instead of cream cheese?
If you’re looking for a lighter option, consider using Greek yogurt or a dairy-free cream cheese alternative. Both will give you a creamy texture while keeping the flavor delicious!
How do I store leftover cheesecake balls?
Store any leftovers in an airtight container in the fridge. They’ll stay fresh for up to a week, making them a great snack to enjoy throughout the week!
Can I freeze Red Velvet Cheesecake Balls?
Yes, you can freeze them! Just place the balls in a single layer on a baking sheet until frozen, then transfer them to a freezer-safe container. They can last up to three months in the freezer. Just thaw them in the fridge before serving.
What’s the best way to decorate these cheesecake balls?
Get creative! You can use sprinkles, crushed nuts, or even drizzle some melted chocolate on top. The options are endless, and it’s a fun way to personalize your Red Velvet Cheesecake Balls!
Final Thoughts
Creating these Red Velvet Cheesecake Balls is more than just baking; it’s about sharing joy and deliciousness with those you love. Each bite is a little piece of happiness, combining the rich flavors of red velvet with the creamy goodness of cheesecake. Whether you’re celebrating a special occasion or simply treating yourself after a long day, these delightful treats are sure to bring smiles all around. So, roll up your sleeves, gather your loved ones, and dive into this sweet adventure. Trust me, the joy of making and sharing these bites is truly priceless!
Print
Red Velvet Cheesecake Balls: A Delightful Treat Awaits!
- Total Time: 1 hour 20 minutes
- Yield: 24 cheesecake balls 1x
- Diet: Vegetarian
Description
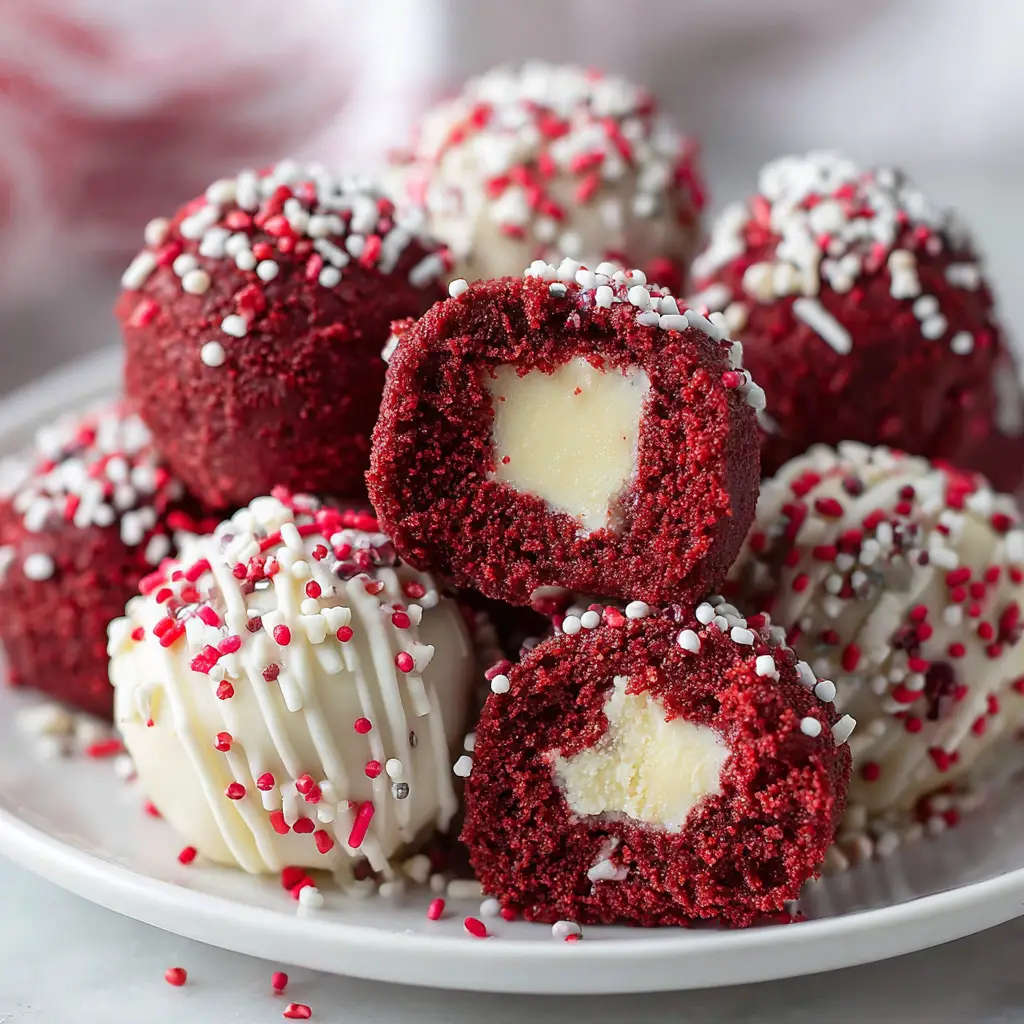
Red Velvet Cheesecake Balls are a delicious and indulgent treat that combines the rich flavors of red velvet cake with creamy cheesecake, all rolled into bite-sized balls.
Ingredients
- 1 box red velvet cake mix
- 1 cup water
- 1/2 cup vegetable oil
- 3 large eggs
- 8 oz cream cheese, softened
- 1/2 cup powdered sugar
- 1 tsp vanilla extract
- 1 cup white chocolate chips
- Sprinkles for decoration (optional)
Instructions
- Preheat the oven to 350°F (175°C) and prepare a baking pan.
- In a large bowl, mix the red velvet cake mix, water, vegetable oil, and eggs until well combined.
- Pour the batter into the prepared baking pan and bake according to package instructions.
- Once baked, let the cake cool completely.
- In another bowl, beat the softened cream cheese, powdered sugar, and vanilla extract until smooth.
- Crumble the cooled red velvet cake into the cream cheese mixture and mix until well combined.
- Roll the mixture into small balls and place them on a baking sheet lined with parchment paper.
- Chill the balls in the refrigerator for at least 30 minutes.
- Melt the white chocolate chips in a microwave or double boiler.
- Dip each chilled cheesecake ball into the melted white chocolate and place back on the parchment paper.
- Sprinkle with decorations if desired and let the chocolate set.
Notes
- For a richer flavor, you can add a splash of almond extract to the cream cheese mixture.
- These cheesecake balls can be stored in the refrigerator for up to a week.
- Feel free to use dark chocolate instead of white chocolate for dipping.
- Prep Time: 20 minutes
- Cook Time: 30 minutes
- Category: Dessert
- Method: Baking and Chilling
- Cuisine: American
Nutrition
- Serving Size: 1 cheesecake ball
- Calories: 150
- Sugar: 10g
- Sodium: 50mg
- Fat: 8g
- Saturated Fat: 4g
- Unsaturated Fat: 2g
- Trans Fat: 0g
- Carbohydrates: 18g
- Fiber: 1g
- Protein: 2g
- Cholesterol: 30mg
Keywords: Red Velvet, Cheesecake, Dessert, Treat, Balls