Introduction to Little Debbie Christmas Tree Cake Balls
As the holiday season approaches, I find myself reminiscing about the sweet treats that bring joy to our gatherings. One of my all-time favorites is the Little Debbie Christmas Tree Cake. Imagine transforming that nostalgic flavor into delightful Little Debbie Christmas Tree Cake Balls! These bite-sized wonders are not only a quick solution for busy days but also a surefire way to impress your loved ones. With minimal effort and maximum flavor, you’ll have a festive dessert that’s perfect for any holiday celebration. Let’s dive into this delicious adventure together!
Why You’ll Love This Little Debbie Christmas Tree Cake Balls
These Little Debbie Christmas Tree Cake Balls are a game-changer for busy moms and professionals alike. They come together in just 20 minutes, making them a breeze to whip up. Plus, the combination of creamy cream cheese and sweet chocolate creates a flavor explosion that will have everyone asking for seconds. Whether you’re hosting a holiday party or just treating your family, these cake balls are sure to spread joy and delight!
Ingredients for Little Debbie Christmas Tree Cake Balls
Gathering the right ingredients is the first step to creating these delightful Little Debbie Christmas Tree Cake Balls. Here’s what you’ll need:
- Little Debbie Christmas Tree Cakes: These iconic cakes are the star of the show, bringing that nostalgic flavor to your dessert.
- Cream Cheese: Softened cream cheese adds a rich, creamy texture that binds everything together beautifully.
- White Chocolate Chips: Melting these chips creates a sweet coating that enhances the overall flavor and adds a festive touch.
- Vegetable Oil: A tablespoon of oil helps the chocolate melt smoothly, ensuring a perfect dip for your cake balls.
- Sprinkles: Use colorful sprinkles for decoration! They add a fun, festive flair that makes these treats even more appealing.
For those looking to elevate the flavor, consider adding a teaspoon of vanilla extract to the cream cheese mixture. It’s a simple tweak that can make a big difference!
All ingredient quantities are available at the bottom of the article for easy printing. Happy baking!
How to Make Little Debbie Christmas Tree Cake Balls
Now that we have our ingredients ready, let’s get started on making these delightful Little Debbie Christmas Tree Cake Balls. Follow these simple steps, and you’ll have a festive treat in no time!
Step 1: Crush the Little Debbie Christmas Tree Cakes
Begin by unwrapping the Little Debbie Christmas Tree Cakes. Place them in a large bowl and crush them into fine crumbs. You can use your hands or a food processor for this. The goal is to create a sandy texture that will hold together nicely.
Step 2: Mix in the Cream Cheese
Next, add the softened cream cheese to the crushed cakes. Using a spatula or your hands, mix until everything is well combined. The cream cheese should blend seamlessly with the crumbs, creating a dough-like consistency. This step is crucial for that rich, creamy flavor!
Step 3: Roll into Balls
Now it’s time to roll the mixture into small balls. Aim for about one inch in diameter. This size is perfect for popping into your mouth! Place each ball on a baking sheet lined with parchment paper. Don’t worry if they aren’t perfect; they’ll still taste amazing!
Step 4: Freeze the Cake Balls
Once you’ve rolled all the balls, pop the baking sheet into the freezer for about 30 minutes. This step helps the cake balls firm up, making them easier to dip in chocolate later. Plus, it builds anticipation for that first bite!
Step 5: Melt the White Chocolate
While the cake balls are freezing, it’s time to melt the white chocolate chips. Place them in a microwave-safe bowl with the vegetable oil. Heat in 30-second intervals, stirring in between, until smooth. The oil helps the chocolate coat the cake balls evenly, giving them that glossy finish.
Step 6: Dip and Decorate
Once the cake balls are firm, it’s time for the fun part! Dip each ball into the melted white chocolate, ensuring they are fully coated. Use a fork to lift them out, allowing any excess chocolate to drip off. Immediately sprinkle with festive sprinkles before the chocolate sets!
Step 7: Refrigerate and Serve
Finally, place the chocolate-coated cake balls back on the parchment paper. Refrigerate them until the chocolate is set, which usually takes about 15-20 minutes. Once they’re ready, serve them up and watch as everyone enjoys these delightful Little Debbie Christmas Tree Cake Balls!
Tips for Success
- Make sure your cream cheese is softened for easy mixing.
- Use a food processor for quick and even crushing of the cakes.
- Don’t skip the freezing step; it helps the balls hold their shape.
- Experiment with different colored sprinkles to match your holiday theme.
- For a smoother chocolate coating, ensure the chocolate is fully melted before dipping.
Equipment Needed
- Large Bowl: A mixing bowl for combining ingredients. A sturdy plastic or glass bowl works well.
- Parchment Paper: Essential for lining your baking sheet. If you don’t have it, a silicone mat is a great alternative.
- Microwave-Safe Bowl: For melting chocolate. Any heatproof bowl will do.
- Fork: Perfect for dipping and lifting the cake balls. A slotted spoon can also work.
Variations
- Chocolate Cake Balls: Swap the Little Debbie Christmas Tree Cakes for chocolate cake for a rich twist.
- Gluten-Free Option: Use gluten-free cake mix and gluten-free cream cheese for a gluten-free treat.
- Nutty Delight: Add crushed nuts like walnuts or pecans to the mixture for added crunch and flavor.
- Minty Fresh: Incorporate a few drops of peppermint extract into the cream cheese for a refreshing mint flavor.
- Colorful Coating: Use colored candy melts instead of white chocolate for a vibrant look that matches your holiday decor.
Serving Suggestions
- Pair these Little Debbie Christmas Tree Cake Balls with a warm cup of hot cocoa for a cozy treat.
- Serve them on a festive platter, garnished with fresh mint leaves for a pop of color.
- For a fun twist, place them in mini cupcake liners for easy serving at parties.
- Consider adding a side of whipped cream for dipping to enhance the experience.
FAQs about Little Debbie Christmas Tree Cake Balls
Can I make these Little Debbie Christmas Tree Cake Balls ahead of time?
Absolutely! You can prepare these cake balls a day in advance. Just store them in an airtight container in the refrigerator until you’re ready to serve. They’ll stay fresh and delicious!
What can I use instead of white chocolate?
If white chocolate isn’t your thing, you can use milk chocolate or dark chocolate instead. Just melt it the same way, and you’ll have a different yet equally delightful flavor!
How do I store leftover cake balls?
Store any leftover Little Debbie Christmas Tree Cake Balls in an airtight container in the refrigerator. They’ll keep well for up to a week, but I doubt they’ll last that long!
Can I freeze these cake balls?
Yes, you can freeze them! Just make sure they’re in a single layer on a baking sheet until frozen, then transfer them to a freezer-safe container. They’ll be good for up to three months!
What other flavors can I try?
Feel free to experiment! You can use different Little Debbie cakes, like the Swiss Rolls or Zebra Cakes, to create unique flavor combinations. The possibilities are endless!
Final Thoughts
Creating Little Debbie Christmas Tree Cake Balls is more than just a recipe; it’s a delightful experience that brings joy to your holiday gatherings. The sweet aroma of melting chocolate and the cheerful colors of sprinkles can instantly lift your spirits. Each bite is a nostalgic reminder of childhood treats, making them perfect for sharing with family and friends. Whether you’re celebrating a festive occasion or simply indulging in a sweet moment, these cake balls are sure to spread smiles. So, roll up your sleeves and enjoy the magic of the season with these delightful bites!
Print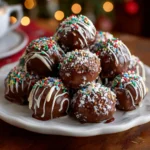
Little Debbie Christmas Tree Cake Balls Delight Your Tastebuds!
- Total Time: 50 minutes
- Yield: 24 cake balls 1x
- Diet: Vegetarian
Description
Little Debbie Christmas Tree Cake Balls are a festive and delicious treat that combines the classic flavors of the beloved Christmas Tree Cakes into bite-sized balls, perfect for holiday gatherings.
Ingredients
- 1 box of Little Debbie Christmas Tree Cakes
- 8 oz cream cheese, softened
- 1 cup white chocolate chips
- 1 tablespoon vegetable oil
- Sprinkles for decoration
Instructions
- Crush the Little Debbie Christmas Tree Cakes in a large bowl until fine crumbs form.
- Add the softened cream cheese to the crumbs and mix until well combined.
- Roll the mixture into small balls and place them on a baking sheet lined with parchment paper.
- Freeze the balls for about 30 minutes until firm.
- In a microwave-safe bowl, melt the white chocolate chips with the vegetable oil until smooth.
- Dip each cake ball into the melted chocolate, ensuring they are fully coated.
- Place the chocolate-coated balls back on the parchment paper and immediately sprinkle with festive sprinkles.
- Refrigerate until the chocolate is set, then serve and enjoy!
Notes
- For a richer flavor, you can add a teaspoon of vanilla extract to the cream cheese mixture.
- Store any leftovers in an airtight container in the refrigerator for up to a week.
- Feel free to use different colored sprinkles to match your holiday theme.
- Prep Time: 20 minutes
- Cook Time: 0 minutes
- Category: Dessert
- Method: No-Bake
- Cuisine: American
Nutrition
- Serving Size: 1 cake ball
- Calories: 120
- Sugar: 10g
- Sodium: 50mg
- Fat: 7g
- Saturated Fat: 4g
- Unsaturated Fat: 2g
- Trans Fat: 0g
- Carbohydrates: 12g
- Fiber: 0g
- Protein: 1g
- Cholesterol: 15mg
Keywords: Little Debbie, Christmas Tree Cake, Cake Balls, Holiday Treats, No-Bake Desserts