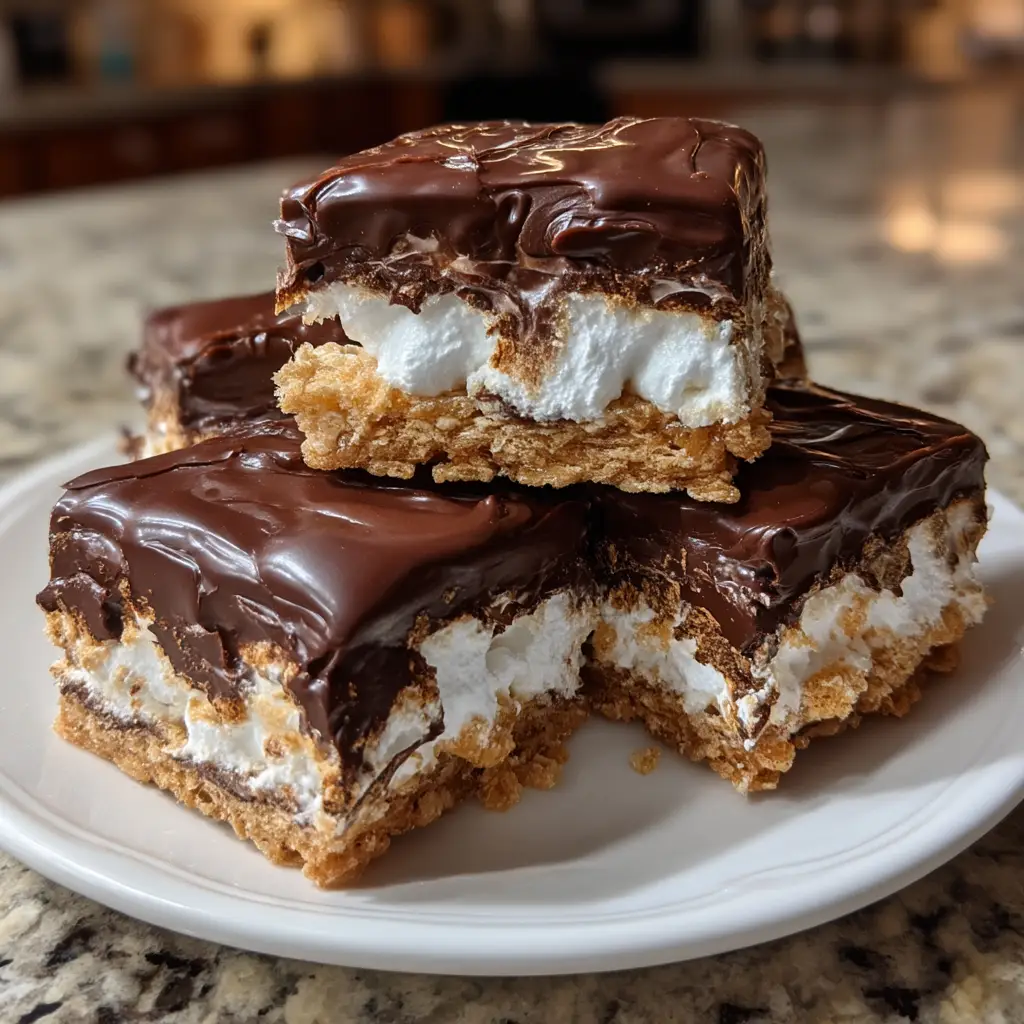
Introduction to Chocolate Marshmallow Graham Bars Recipe
Ah, the sweet aroma of chocolate wafting through the kitchen! It takes me back to my childhood, where every family gathering was a celebration of flavors and laughter. One of my fondest memories is making Chocolate Marshmallow Graham Bars with my grandmother. She had a magical way of turning simple ingredients into delightful treats that brought smiles to everyone’s faces. I can still hear her laughter as we melted chocolate and toasted marshmallows, creating a symphony of flavors that danced on our taste buds.
These bars are not just a dessert; they are a nostalgic journey wrapped in layers of chocolate, fluffy marshmallows, and crunchy graham crackers. Each bite is like a warm hug, reminding me of cozy evenings spent around the fire, sharing stories and making memories. Whether you’re looking to impress guests at a party or simply indulge in a sweet treat after dinner, these Chocolate Marshmallow Graham Bars are the perfect choice.
What I love most about this recipe is its simplicity. You don’t need to be a master chef to whip up these delicious bars. With just a handful of ingredients and a little bit of love, you can create a dessert that will have everyone asking for seconds. So, roll up your sleeves, and let’s dive into this delightful adventure of flavors together!
Ingredients for Chocolate Marshmallow Graham Bars Recipe
Before we embark on this delicious journey, let’s gather our ingredients. I always believe that the quality of ingredients can make or break a recipe. So, I recommend using the best you can find. Here’s what you’ll need to create these delightful Chocolate Marshmallow Graham Bars:
Main Ingredients
- 1 ½ cups graham cracker crumbs (about 10 full sheets)
- ½ cup unsalted butter, melted
- 1 cup semi-sweet chocolate chips
- 1 cup mini marshmallows
- ½ cup sweetened condensed milk
- 1 teaspoon vanilla extract
When I make these bars, I always opt for high-quality chocolate chips. They melt beautifully and give a rich flavor that elevates the entire dessert. If you can find artisanal chocolate, don’t hesitate to use it! It truly makes a difference.
Optional Add-ons
- 1/2 cup chopped nuts (like walnuts or pecans) for added crunch
- 1/4 cup peanut butter chips for a nutty twist
- 1/4 teaspoon sea salt to sprinkle on top for a sweet-salty contrast
- 1/2 teaspoon cinnamon for a warm, spicy flavor
These optional add-ons can take your bars to the next level. I love adding a sprinkle of sea salt on top right before serving. It enhances the sweetness and creates a delightful contrast that keeps everyone coming back for more. Feel free to mix and match based on your taste preferences!
How to Prepare Chocolate Marshmallow Graham Bars Recipe
Now that we have our ingredients ready, it’s time to roll up our sleeves and get cooking! Making Chocolate Marshmallow Graham Bars is a delightful process that fills your kitchen with sweet aromas and happy memories. Let’s dive into the steps together!
Step 1: Prepare the Base
First things first, we need to create a solid foundation for our bars. In a mixing bowl, combine the graham cracker crumbs and melted butter. Stir until the crumbs are evenly coated. This mixture will form the crunchy base that holds everything together.
Tips for Step 1
- Make sure the butter is fully melted but not too hot. You don’t want to cook the crumbs!
- Use a fork or your hands to mix the crumbs and butter thoroughly. It should resemble wet sand.
- Press the mixture firmly into the bottom of a greased 9×9-inch baking pan. This helps create a sturdy base.
Step 2: Make the Chocolate Layer
Next up, let’s melt that delicious chocolate! In a microwave-safe bowl, combine the semi-sweet chocolate chips and sweetened condensed milk. Heat in the microwave in 30-second intervals, stirring in between, until the chocolate is smooth and creamy.
Tips for Step 2
- Be careful not to overheat the chocolate. It can seize up and become grainy.
- If you prefer, you can melt the chocolate using a double boiler on the stove for more control.
- Once melted, stir in the vanilla extract for an extra layer of flavor.
Step 3: Add the Marshmallow Topping
Now comes the fun part! Pour the melted chocolate mixture over the graham cracker base, spreading it evenly. Then, sprinkle the mini marshmallows on top. They will puff up beautifully as they bake!
Tips for Step 3
- For a toasted marshmallow flavor, you can use a kitchen torch to lightly brown the marshmallows after baking.
- Don’t be shy with the marshmallows! The more, the merrier!
- Feel free to add any optional toppings, like nuts or peanut butter chips, at this stage.
Step 4: Assemble and Chill
Finally, it’s time to bring everything together! Bake the bars in a preheated oven at 350°F (175°C) for about 15-20 minutes, or until the marshmallows are golden and the chocolate is bubbly. Once done, remove them from the oven and let them cool completely in the pan.
Tips for Step 4
- After cooling, refrigerate the bars for at least an hour. This helps them set and makes cutting easier.
- Use a sharp knife to cut the bars into squares. Wipe the knife with a damp cloth between cuts for clean edges.
- Store any leftovers in an airtight container at room temperature or in the fridge for a cool treat!
And there you have it! A simple yet scrumptious recipe for Chocolate Marshmallow Graham Bars that will surely delight your family and friends. I can’t wait for you to try this out and create your own sweet memories!
Equipment Needed for Chocolate Marshmallow Graham Bars Recipe
Before we dive into the delicious world of Chocolate Marshmallow Graham Bars, let’s make sure we have the right tools at our disposal. Having the right equipment can make the cooking process smoother and more enjoyable. Here’s what you’ll need:
- 9×9-inch baking pan: This is perfect for creating the ideal thickness for your bars. If you don’t have one, an 8×8-inch pan will work too; just keep an eye on the baking time.
- Mixing bowls: A couple of medium-sized bowls will help you mix your ingredients without any mess.
- Microwave-safe bowl: For melting the chocolate, a microwave-safe bowl is essential. If you prefer, you can use a double boiler on the stove instead.
- Spatula: A rubber spatula is great for spreading the chocolate and marshmallows evenly.
- Measuring cups and spoons: Accurate measurements are key to achieving the perfect balance of flavors.
- Sharp knife: For cutting the bars into neat squares once they’ve cooled. A serrated knife works wonders for this task!
With these tools in hand, you’re all set to create your Chocolate Marshmallow Graham Bars. Remember, cooking is all about improvisation, so if you don’t have a specific tool, don’t hesitate to get creative! A little resourcefulness can lead to delightful surprises in the kitchen.
Variations of Chocolate Marshmallow Graham Bars Recipe
As a passionate home cook, I love experimenting with recipes to create new flavors and textures. The beauty of Chocolate Marshmallow Graham Bars is their versatility! Here are a few fun variations that I’ve tried and absolutely adored:
- Mint Chocolate Delight: Add a few drops of peppermint extract to the chocolate layer for a refreshing twist. Top with crushed peppermint candies for a festive touch!
- Cookie Butter Bliss: Swap out half of the graham cracker crumbs for cookie butter crumbs. This adds a rich, spiced flavor that pairs beautifully with the chocolate and marshmallows.
- Fruit Fusion: Mix in some chopped dried fruits like cherries or cranberries into the chocolate layer. The tartness of the fruit balances the sweetness perfectly.
- Nutty Chocolate Crunch: Incorporate a mix of chopped nuts, like almonds or hazelnuts, into the chocolate layer for an added crunch. It gives a delightful texture that keeps every bite interesting!
These variations not only keep things exciting but also allow you to tailor the bars to your taste preferences. I encourage you to get creative and make these bars your own! Who knows, you might just stumble upon a new family favorite.
Cooking Notes for Chocolate Marshmallow Graham Bars Recipe
As I’ve learned through my culinary adventures, a few cooking notes can make all the difference in achieving the perfect Chocolate Marshmallow Graham Bars. Here are some tips that I always keep in mind when whipping up this delightful treat:
- Ingredient Temperature: Make sure your butter is at room temperature before melting. This helps it blend smoothly with the graham cracker crumbs.
- Chocolate Quality: The type of chocolate you use can greatly affect the flavor. I recommend using high-quality chocolate chips or even chopping up a chocolate bar for a richer taste.
- Marshmallow Placement: When adding the marshmallows, try to spread them evenly across the chocolate layer. This ensures that every bite is filled with that gooey goodness!
- Cooling Time: Patience is key! Allow the bars to cool completely before cutting. This helps them set properly and makes for cleaner cuts.
- Storage Tips: If you have leftovers (which is rare in my house!), store them in an airtight container. They can last for a few days, but I promise they won’t last long!
These little notes have helped me perfect my recipe over the years. I hope they guide you on your journey to creating the most scrumptious Chocolate Marshmallow Graham Bars! Happy baking!
Serving Suggestions for Chocolate Marshmallow Graham Bars Recipe
Now that we’ve created these delightful Chocolate Marshmallow Graham Bars, it’s time to think about how to serve them! Presentation can elevate any dessert, and I love to get a little creative when it comes to serving. Here are some of my favorite serving suggestions that will surely impress your family and friends:
- Warm and Gooey: Serve the bars warm, straight from the oven. The chocolate will be melty, and the marshmallows will be soft and gooey. Pair them with a scoop of vanilla ice cream for a decadent treat!
- Drizzle of Chocolate: For an extra touch of elegance, drizzle some melted chocolate over the top of the bars before serving. It adds a beautiful finish and enhances the chocolate flavor.
- Garnish with Fresh Berries: Fresh strawberries or raspberries add a pop of color and a refreshing contrast to the sweetness of the bars. Plus, they make for a lovely presentation!
- Mini Dessert Plates: Cut the bars into smaller squares and serve them on mini dessert plates. This way, guests can enjoy a bite-sized treat without feeling too indulgent.
- Pair with Coffee or Hot Cocoa: These bars are perfect for pairing with a warm beverage. A cup of coffee or hot cocoa complements the flavors beautifully and makes for a cozy dessert experience.
These serving suggestions not only enhance the visual appeal but also create a delightful experience for everyone. I can’t wait for you to try these ideas and see how they elevate your Chocolate Marshmallow Graham Bars to a whole new level of deliciousness!
Tips for Perfecting Chocolate Marshmallow Graham Bars Recipe
As I’ve spent countless hours perfecting my Chocolate Marshmallow Graham Bars, I’ve gathered a treasure trove of tips that can help you achieve dessert perfection. Here are some of my favorite nuggets of wisdom that I always keep in mind:
- Chill Your Ingredients: If you have time, chill your chocolate chips and butter before starting. This helps them melt evenly and creates a smoother texture.
- Don’t Rush the Cooling: Allow the bars to cool completely before cutting. This ensures they hold their shape and makes for cleaner, more appealing squares.
- Experiment with Layers: Feel free to add an extra layer of graham cracker crumbs or chocolate if you want a more decadent treat. Layering can add depth to the flavors!
- Use Parchment Paper: Lining your baking pan with parchment paper makes it easier to lift the bars out once they’re set. It’s a simple trick that saves time and mess!
- Adjust Sweetness: If you prefer a less sweet treat, reduce the amount of sweetened condensed milk or use dark chocolate instead. It balances the flavors beautifully.
These tips have transformed my baking experience and helped me create the most delightful Chocolate Marshmallow Graham Bars. I hope they inspire you to experiment and find your own perfect version of this classic treat!
Breakdown of Time for Chocolate Marshmallow Graham Bars Recipe
As a passionate home cook, I know that time management is key in the kitchen. When it comes to making Chocolate Marshmallow Graham Bars, it’s all about balancing the prep and cooking times to create a delicious treat without feeling rushed. Here’s a quick breakdown of the time you’ll need:
- Prep Time: 15 minutes – This includes gathering your ingredients, mixing the graham cracker base, and melting the chocolate.
- Cooking Time: 20 minutes – The bars will bake in the oven until the marshmallows are golden and the chocolate is bubbly.
- Total Time: 35 minutes – In just over half an hour, you’ll have a delightful dessert ready to cool and enjoy!
Keep in mind that while the cooking time is relatively short, allowing the bars to cool completely before cutting is essential. This patience pays off with perfectly set bars that are easy to slice. I promise, the wait will be worth it when you take that first delicious bite!
Nutritional Information for Chocolate Marshmallow Graham Bars Recipe
As a passionate home cook, I always find it helpful to know the nutritional content of the treats I whip up. While Chocolate Marshmallow Graham Bars are undeniably a sweet indulgence, they can still fit into a balanced diet when enjoyed in moderation. Here’s a general breakdown of the nutritional information per serving (assuming you cut the bars into 16 squares):
- Calories: Approximately 150 calories
- Fat: 7g (Saturated Fat: 4g)
- Carbohydrates: 20g (Sugars: 10g)
- Protein: 2g
- Fiber: 1g
Keep in mind that these values can vary based on the specific brands of ingredients you use and any optional add-ons you choose to include. If you’re looking to lighten things up a bit, consider using dark chocolate or reducing the amount of sweetened condensed milk. No matter how you make them, these bars are sure to bring joy to your taste buds!
Frequently Asked Questions about Chocolate Marshmallow Graham Bars Recipe
As I’ve shared my love for Chocolate Marshmallow Graham Bars, I often get questions from fellow home cooks eager to try this delightful recipe. I love answering these queries because it shows just how much joy these bars can bring! Here are some of the most frequently asked questions, along with my personal insights:
Can I use different types of chocolate?
Absolutely! While I love semi-sweet chocolate for its rich flavor, you can experiment with milk chocolate for a sweeter treat or dark chocolate for a more intense taste. Each type brings its own unique twist to the bars, so feel free to get creative!
How do I store the bars?
To keep your Chocolate Marshmallow Graham Bars fresh, store them in an airtight container at room temperature. If you prefer a chilled treat, you can refrigerate them. Just remember to let them sit at room temperature for a few minutes before serving, so they soften up a bit!
Can I make these bars ahead of time?
Yes, you can! These bars are perfect for making ahead of time. Just prepare them, let them cool completely, and store them in an airtight container. They can last for several days, making them a great option for parties or gatherings!
What if I don’t have graham crackers?
No worries! If you don’t have graham crackers on hand, you can substitute them with crushed digestive biscuits or even vanilla wafers. The flavor will be slightly different, but they’ll still create a delicious base for your bars!
Can I add fresh fruit to the bars?
Definitely! Fresh fruit can add a delightful twist to your bars. I recommend adding sliced strawberries or bananas on top of the chocolate layer before adding the marshmallows. Just be sure to adjust the baking time slightly, as the moisture from the fruit can affect the texture.
These questions reflect the curiosity and creativity that comes with baking. I hope my answers inspire you to dive into making your own Chocolate Marshmallow Graham Bars and to enjoy the sweet journey along the way! If you have any more questions, feel free to reach out. Happy baking!
Conclusion on Chocolate Marshmallow Graham Bars Recipe
As I reflect on my journey of creating Chocolate Marshmallow Graham Bars, I can’t help but smile at the joy they bring. These bars are more than just a dessert; they are a celebration of flavors, memories, and the simple pleasure of sharing something sweet with loved ones. The combination of crunchy graham crackers, rich chocolate, and fluffy marshmallows creates a delightful treat that appeals to both kids and adults alike.
What I love most about this recipe is its versatility. Whether you stick to the classic version or experiment with fun variations, there’s always room for creativity. Plus, the ease of preparation makes it accessible for cooks of all skill levels. In just a short time, you can whip up a batch that will have everyone asking for the recipe!
So, whether you’re hosting a gathering, celebrating a special occasion, or simply indulging in a sweet moment at home, these Chocolate Marshmallow Graham Bars are sure to impress. I encourage you to gather your ingredients, roll up your sleeves, and embark on this delicious adventure. Trust me, the smiles and satisfied sighs will be worth every moment spent in the kitchen!