Introduction to Red Velvet Christmas Lush
As the holiday season approaches, I find myself dreaming of festive treats that bring joy to my family. One dessert that never fails to impress is the Red Velvet Christmas Lush. This delightful dessert combines the rich flavors of red velvet cake with creamy layers, making it a showstopper at any gathering. It’s perfect for busy moms like us, offering a quick solution for holiday entertaining without sacrificing taste. Plus, it’s a dish that will surely make your loved ones smile, creating sweet memories around the table.
Why You’ll Love This Red Velvet Christmas Lush
This Red Velvet Christmas Lush is a dream come true for busy moms and professionals alike. It’s incredibly easy to whip up, taking just a little over two hours from start to finish. The layers of creamy goodness and rich red velvet cake create a taste sensation that’s hard to resist. Plus, it’s a crowd-pleaser, making it the perfect dessert to impress your family and friends during the holiday season.
Ingredients for Red Velvet Christmas Lush
Gathering the right ingredients is the first step to creating this festive masterpiece. Here’s what you’ll need:
- Red velvet cake mix: The star of the show! This mix provides that signature flavor and color.
- Vegetable oil: This adds moisture to the cake, ensuring it’s soft and tender.
- Large eggs: Eggs help bind the ingredients together and contribute to the cake’s fluffiness.
- Water: A simple addition that helps to activate the cake mix and create the perfect batter consistency.
- Cream cheese: This creamy delight forms the base of our luscious layer, adding richness and tang.
- Powdered sugar: Sweetness is key! This sugar dissolves easily, creating a smooth cream cheese mixture.
- Whipped topping: Light and airy, it gives the cream cheese layer a fluffy texture that’s irresistible.
- Milk: Essential for preparing the instant vanilla pudding, adding creaminess to the dessert.
- Instant vanilla pudding mix: This adds a sweet, creamy layer that complements the red velvet perfectly.
- Crushed cookies: Use these for topping! They add a delightful crunch and can be any cookie you love.
- Chocolate shavings: A beautiful garnish that adds a touch of elegance and extra chocolatey goodness.
For those looking to switch things up, consider adding a splash of vanilla extract to the cream cheese mixture for an extra flavor boost. You can also substitute the crushed cookies with crushed peppermint for a festive twist. Remember, the exact quantities are available at the bottom of the article for easy printing!
How to Make Red Velvet Christmas Lush
Now that we have our ingredients ready, let’s dive into the fun part—making this Red Velvet Christmas Lush! Follow these simple steps, and you’ll have a stunning dessert that will wow your family and friends.
Step 1: Preheat the Oven
First things first, preheat your oven to 350°F (175°C). Preheating is crucial because it ensures that your cake bakes evenly. If you skip this step, you might end up with a cake that’s undercooked in the middle or burnt on the edges. Trust me, a little patience here goes a long way!
Step 2: Prepare the Cake Batter
In a large bowl, combine the red velvet cake mix, vegetable oil, eggs, and water. Mix everything together until it’s well combined. You want a smooth batter without lumps. If you’re feeling adventurous, you can even use an electric mixer for a fluffier texture. Just don’t overmix; a few lumps are okay!
Step 3: Bake the Cake
Pour the batter into a greased baking dish and pop it into the oven. Bake for 30-35 minutes. To check if it’s done, insert a toothpick into the center. If it comes out clean, your cake is ready! If not, give it a few more minutes. Remember, every oven is a little different.
Step 4: Cool the Cake
Once your cake is baked, let it cool completely in the pan. Cooling is essential because it prevents the layers from becoming mushy when you assemble the dessert. I usually let mine cool for about 30 minutes before transferring it to a wire rack. Patience pays off here!
Step 5: Make the Cream Cheese Mixture
In another bowl, beat the softened cream cheese and powdered sugar together until smooth. This step is all about achieving that creamy texture. If you want to make it even smoother, you can use a hand mixer. Once it’s nice and creamy, gently fold in the whipped topping. This will give it that light, airy feel!
Step 6: Prepare the Vanilla Pudding
Now, let’s prepare the instant vanilla pudding. Follow the package instructions, using milk to mix it up. It’s super easy! Just whisk until it thickens. This layer adds a delightful creaminess that pairs perfectly with the red velvet cake.
Step 7: Assemble the Layers
Once your cake is cooled, crumble it into the bottom of a serving dish. Spread the cream cheese mixture over the crumbled cake, followed by the prepared vanilla pudding. Layering is key here! You want to create a beautiful contrast of colors and textures.
Step 8: Add Toppings
Now for the fun part—toppings! Sprinkle crushed cookies over the top for a delightful crunch. You can use any cookies you love, but I recommend chocolate or even gingerbread for a festive touch. Finish it off with chocolate shavings for that extra wow factor!
Step 9: Chill Before Serving
Finally, chill your Red Velvet Christmas Lush in the refrigerator for at least 2 hours. Chilling allows the flavors to meld together beautifully and gives the dessert a lovely texture. Trust me, the wait will be worth it when you take that first bite!
Tips for Success
- Always measure your ingredients accurately for the best results.
- Let the cake cool completely before layering to avoid a soggy dessert.
- Use a hand mixer for the cream cheese mixture to achieve a smooth texture.
- Feel free to experiment with different cookie toppings for a unique twist.
- Chill the dessert overnight for even better flavor and texture.
Equipment Needed
- Mixing bowls: A set of various sizes is handy. You can also use any large bowl you have.
- Electric mixer: Great for beating the cream cheese. A whisk works too, just a bit more elbow grease!
- Baking dish: A 9×13 inch dish is ideal. Any similar-sized dish will do.
- Measuring cups and spoons: Essential for accuracy. You can use any standard measuring tools.
- Spatula: Perfect for spreading layers. A large spoon can work in a pinch!
Variations of Red Velvet Christmas Lush
- Gluten-Free Option: Use a gluten-free red velvet cake mix to make this dessert suitable for those with gluten sensitivities.
- Healthier Twist: Substitute Greek yogurt for cream cheese to reduce fat while adding protein and a tangy flavor.
- Vegan Version: Replace eggs with flaxseed meal and use a plant-based cream cheese and whipped topping for a vegan-friendly dessert.
- Minty Fresh: Add crushed peppermint candies to the cream cheese mixture for a refreshing holiday flavor.
- Chocolate Lovers: Incorporate chocolate pudding instead of vanilla for an extra chocolatey layer that pairs beautifully with red velvet.
Serving Suggestions for Red Velvet Christmas Lush
- Pair with a scoop of vanilla ice cream for a delightful contrast in temperature and texture.
- Serve alongside a warm cup of spiced apple cider to enhance the holiday spirit.
- Garnish with fresh mint leaves for a pop of color and freshness.
- Present in individual cups for a charming, personal touch at gatherings.
- Dust with powdered sugar just before serving for an elegant finish.
FAQs about Red Velvet Christmas Lush
Can I make Red Velvet Christmas Lush ahead of time?
Absolutely! In fact, making it a day in advance is a great idea. This allows the flavors to meld beautifully, making each bite even more delicious. Just be sure to keep it covered in the refrigerator until you’re ready to serve.
What can I use instead of whipped topping?
If you prefer a homemade touch, you can whip up some heavy cream to use instead of whipped topping. Just beat it until soft peaks form, and fold it into the cream cheese mixture for a delightful, fresh flavor.
How do I store leftovers?
Store any leftovers in an airtight container in the refrigerator. It should stay fresh for about 3-4 days. Just be prepared for the flavors to deepen as it sits!
Can I freeze Red Velvet Christmas Lush?
While I recommend enjoying it fresh, you can freeze the layers separately. Just be aware that the texture may change slightly once thawed. If you do freeze it, let it thaw in the refrigerator before serving.
What’s the best way to serve Red Velvet Christmas Lush?
For a stunning presentation, serve it in individual cups or glasses. This not only looks beautiful but also makes it easy for guests to enjoy. Don’t forget to add a sprinkle of chocolate shavings or crushed cookies on top for that extra festive touch!
Final Thoughts
Creating this Red Velvet Christmas Lush is more than just baking; it’s about sharing joy and love during the holiday season. Each layer tells a story, from the rich red velvet cake to the creamy, dreamy toppings. I love how this dessert brings my family together, sparking laughter and sweet memories around the table. Whether you’re hosting a festive gathering or simply treating your loved ones, this indulgent dessert is sure to impress. So, roll up your sleeves, embrace the holiday spirit, and let this delightful treat be the centerpiece of your celebrations!
Print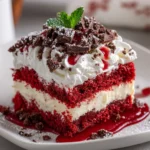
Red Velvet Christmas Lush: Unwrap Holiday Indulgence!
- Total Time: 2 hours 55 minutes
- Yield: 12 servings 1x
- Diet: Vegetarian
Description
A delightful and indulgent dessert that combines the rich flavors of red velvet cake with creamy layers, perfect for the holiday season.
Ingredients
- 1 box red velvet cake mix
- 1/2 cup vegetable oil
- 3 large eggs
- 1 cup water
- 8 oz cream cheese, softened
- 1 cup powdered sugar
- 1 cup whipped topping
- 1 cup milk
- 1 package instant vanilla pudding mix
- 1 cup crushed cookies (for topping)
- Chocolate shavings (for garnish)
Instructions
- Preheat the oven to 350°F (175°C).
- In a large bowl, mix the red velvet cake mix, vegetable oil, eggs, and water until well combined.
- Pour the batter into a greased baking dish and bake for 30-35 minutes or until a toothpick comes out clean.
- Let the cake cool completely.
- In another bowl, beat the cream cheese and powdered sugar until smooth.
- Fold in the whipped topping until well combined.
- Prepare the instant vanilla pudding according to package instructions using milk.
- Once the cake is cooled, crumble it into the bottom of a serving dish.
- Layer the cream cheese mixture over the crumbled cake, followed by the vanilla pudding.
- Top with crushed cookies and chocolate shavings for garnish.
- Chill in the refrigerator for at least 2 hours before serving.
Notes
- For a richer flavor, add a splash of vanilla extract to the cream cheese mixture.
- Can be made a day in advance for easier holiday entertaining.
- Feel free to substitute the crushed cookies with crushed peppermint for a festive touch.
- Prep Time: 20 minutes
- Cook Time: 35 minutes
- Category: Dessert
- Method: Baking and Layering
- Cuisine: American
Nutrition
- Serving Size: 1 slice
- Calories: 350
- Sugar: 25g
- Sodium: 200mg
- Fat: 15g
- Saturated Fat: 8g
- Unsaturated Fat: 5g
- Trans Fat: 0g
- Carbohydrates: 45g
- Fiber: 1g
- Protein: 4g
- Cholesterol: 50mg
Keywords: Red Velvet Christmas Lush, Holiday Dessert, Christmas Treat, Red Velvet Cake