Indulge in a sweet symphony of nostalgia and flavor with this Fruity Pebbles Icebox Cake, a dessert that dances between a creamy, dreamy texture and a delightfully crunchy finish. As you dive into each luscious bite, the vibrant colors and playful flavors of Fruity Pebbles cereal bring back cherished childhood memories of breakfast bliss. The creamy layers of vanilla pudding and fluffy whipped topping create a comforting embrace, while the crisp graham crackers provide a satisfying crunch that echoes the delightful snap of your favorite childhood cereals.
Picture this: a warm afternoon, the sun shimmering through the windows, and a slice of this glamorous cake calling your name from the fridge. The first spoonful hits your palate with a thrilling explosion of sweet, fruity notes, reminiscent of summer days spent playing outside. The layers meld together in a harmonious blend of textures and tastes, each forkful coaxing you back for just one more bite… and then another. Whether you’re serving it at a festive gathering or crafting a simple weeknight treat for the family, this Fruity Pebbles Icebox Cake will undoubtedly steal the show with its eye-catching appearance and delightful flavor.
Why You’ll Love This Fruity Pebbles Icebox Cake
This cake is an electrifyingly fun twist on traditional desserts, perfect for every occasion—from birthday parties to casual summer gatherings. The vibrant hues of the Fruity Pebbles create a feast for the eyes, sure to make any table pop. Beyond its striking appearance, this no-bake wonder marries sweetness with a lightness that leaves you satisfied but not overwhelmed. The creamy vanilla layers blend beautifully with those colorful cereal morsels, creating a dessert experience unlike any other.
Not only is this cake delicious, but it also carries a sense of nostalgia, evoking memories of carefree childhood mornings. It stands out as a playful dessert that appeals to both kids and adults alike, making it a universal favorite. Plus, it can be prepared ahead of time, allowing you to enjoy your gathering without the last-minute frenzy.
Preparation Phase & Tools to Use
Before diving into this delightful recipe, gather a few essential tools that will make your experience efficient and enjoyable:
- 9×13 Glass Baking Dish: This versatile dish not only allows you to create beautiful layers but also beautifully showcases your dessert, making it easy to serve.
- Mixing Bowls: At least two medium bowls will help separate your ingredients and keep things organized.
- Whisk: Use this to blend the pudding and milk until the perfect thick consistency is achieved.
- Spatula: A silicone spatula will be your best friend for folding in whipped cream and spreading the mousse evenly.
- Plastic Wrap: Cover your cake with plastic wrap while it chills, ensuring it stays fresh and tasty.
Preparation Tips:
- Ensure your Cool Whip is fully thawed for better folding into the pudding mix.
- Chill the finished cake overnight to enhance the flavors and set the layers perfectly.
Ingredients for Fruity Pebbles Icebox Cake
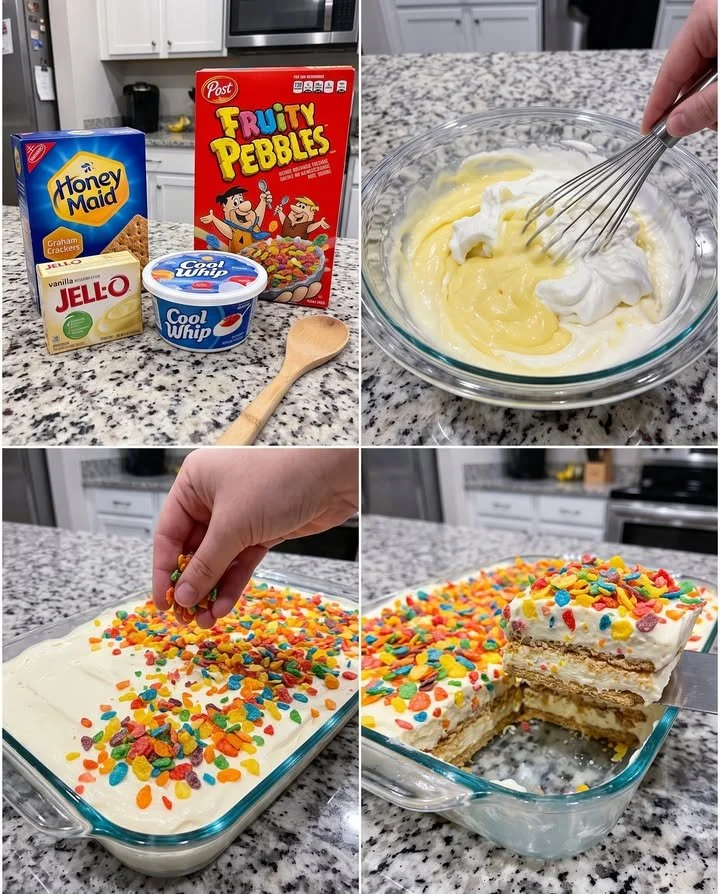
- 1 box (14.4 oz) Honey Maid Graham Crackers: These Crackers provide a perfectly sweet, crunchy base.
- 2 boxes (3.4 oz each) Jell-O Vanilla Instant Pudding: This magical ingredient creates the creamy, dreamy layers we crave.
- 3 cups cold milk: Essential for mixing with the pudding, it adds richness to each bite.
- 1 tub (8 oz) Cool Whip, thawed: This lightens the pudding mixture, adding an airy fluffiness.
- 2 1/2 cups Post Fruity Pebbles Cereal: The star of the show, delivering crunch and joyful fruity flavor that shines through.
Feel free to get playful with substitutions:
- For a gluten-free option, consider using gluten-free graham crackers.
- If you’re looking for a fruity twist, swap vanilla pudding for banana or strawberry flavored.
How to Make Fruity Pebbles Icebox Cake
Creating this delightful dessert is as easy as pie—or rather, cake! Follow these simple steps to bring this masterpiece to life:
-
Prepare the Mousse: In a medium mixing bowl, whisk together the Jell-O vanilla pudding mix and cold milk. Blend until the mixture thickens into a luscious, creamy mousse. Gently fold in half of the thawed Cool Whip until just combined, creating a light, fluffy texture.
-
Layer the Graham Crackers: Line the bottom of your 9×13 glass baking dish with a single layer of Honey Maid Graham Crackers, ensuring they sit closely together.
-
Add the First Layer: Spread half of the vanilla mousse over the graham crackers, using a spatula to create an even layer. Then, generously sprinkle Post Fruity Pebbles Cereal over the mousse, ensuring every bite bursts with flavor.
-
Repeat the Process: Add another layer of graham crackers on top of the Fruity Pebbles. Spread the remaining mousse over this layer, followed by the rest of the Cool Whip. Don’t skimp on the decoration—sprinkle a hearty layer of more Fruity Pebbles on top.
-
Chill and Set: Cover the dish with plastic wrap and refrigerate overnight. This step is crucial; it allows flavors to meld and the cake to achieve its ideal creamy consistency.
Chef’s Notes & Helpful Tips
To ensure your Fruity Pebbles Icebox Cake turns out wonderfully every time, keep these tips in mind:
- Make-ahead Tips: Prepare this cake a day in advance for truly optimal flavor as the ingredients meld beautifully when given time.
- Cooking Alternatives: This recipe is best served chilled, so no need for baking! It’s perfect for outdoor gatherings where oven space may be limited.
- Customization Ideas: Feeling adventurous? Incorporate layers of fresh fruit like sliced strawberries or bananas between the mousse layers for an added pop of flavor.
Common Mistakes to Avoid
Crafting the perfect icebox cake requires a few careful considerations. Avoid these common pitfalls:
- Skip the Thaw: Don’t rush the thawing of your Cool Whip. If it’s still icy, the texture won’t be optimal.
- Layering Dilemmas: Ensure you create even layers. An uneven distribution might lead to a wobbly cake structure.
- Rushing Chill Time: Skipping the overnight chilling time might result in a messy presentation. Don’t skip this vital step!
What to Serve With Fruity Pebbles Icebox Cake
Pair this charming dessert with these delightful accompaniments to elevate your dining experience:
- Fresh Berries: Their natural tartness perfectly balances the sweet creaminess of the cake.
- Vanilla Ice Cream: The cool creaminess complements the textures in the cake.
- Homemade Whipped Cream: A dollop of fresh whipped cream adds a light yet luxurious touch.
- Grilled Peaches: The warm, caramelized flavor of grilled peaches provides a wonderful summer contrast.
- Mint Teas or Lemonades: Refreshing beverages elevate the overall dessert experience.
- Chocolate Drizzle: A light drizzle adds a rich twist that some chocolate lovers will appreciate.
Storage & Reheating Instructions
This cake truly shines when it’s fresh, but it can hold its charm for a few days:
- Refrigerator: Store any leftovers in an airtight container in the fridge for up to 3 days. The flavors continue to develop, making each bite just as delicious.
- Freezer: For longer storage, wrap well and freeze for up to a month. When ready to enjoy, thaw in the refrigerator overnight before serving.
- Reheating: This dessert is best served cold, so there’s no need for reheating. If you prefer warmer treats, consider serving alongside warm fruit.
Estimated Nutrition Information
This delightful dessert offers approximately:
- Calories: 300
- Total Fat: 12g
- Saturated Fat: 7g
- Cholesterol: 15mg
- Sodium: 200mg
- Carbohydrates: 46g
- Sugar: 25g
- Protein: 3g
(Note: Values may vary based on specific brands and ingredient variations.)
FAQs
-
Can I use a different flavor of pudding?
Absolutely! Feel free to experiment with other flavors like banana or chocolate for a delicious twist. -
Is there a gluten-free option for this cake?
Yes! Substitute regular graham crackers with gluten-free alternatives to make this cake accessible for those with dietary restrictions. -
How long before serving should I prepare this cake?
For best results, prepare the cake the night before you plan to serve it. This allows flavors to meld beautifully. -
Can I freeze this cake?
Yes! This dessert freezes well. Just wrap securely in plastic wrap and foil, and it can be stored for up to a month. -
What other toppings can I add?
Consider fresh fruits like strawberries, blueberries, or even a sprinkle of toasted coconut for added texture and flavor.
As you embark on your journey to create this delightful Fruity Pebbles Icebox Cake, let each layer remind you of the joy that desserts bring into our lives. The blend of creamy sweetness and crunch creates an experience that both delights the senses and warms the heart. So gather your loved ones, whip up this playful treat, and enjoy the smiles it brings around your table. It’s more than just a dessert; it’s a celebration of nostalgia, flavor, and togetherness. Don’t hesitate to join the fun—your taste buds will thank you!
Print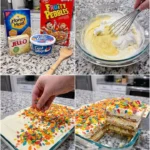
Fruity Pebbles Icebox Cake
- Total Time: 720 minutes
- Yield: 12 servings 1x
- Diet: Vegetarian
Description
A nostalgic dessert combining creamy vanilla layers with the delightful crunch of Fruity Pebbles, perfect for any occasion.
Ingredients
- 1 box (14.4 oz) Honey Maid Graham Crackers
- 2 boxes (3.4 oz each) Jell-O Vanilla Instant Pudding
- 3 cups cold milk
- 1 tub (8 oz) Cool Whip, thawed
- 2 1/2 cups Post Fruity Pebbles Cereal
Instructions
- Prepare the Mousse: In a medium mixing bowl, whisk together the Jell-O vanilla pudding mix and cold milk. Blend until it thickens into a creamy mousse. Gently fold in half of the thawed Cool Whip until just combined.
- Layer the Graham Crackers: Line the bottom of your 9×13 glass baking dish with a layer of Honey Maid Graham Crackers.
- Add the First Layer: Spread half of the vanilla mousse over the graham crackers and sprinkle Fruity Pebbles on top.
- Repeat the Process: Add another layer of graham crackers, spread the remaining mousse, followed by the rest of the Cool Whip and more Fruity Pebbles on top.
- Chill and Set: Cover the dish with plastic wrap and refrigerate overnight.
Notes
Ensure Cool Whip is fully thawed for better folding. Prepare a day in advance for optimal flavor.
- Prep Time: 15 minutes
- Cook Time: 0 minutes
- Category: Dessert
- Method: No-Bake
- Cuisine: American
Nutrition
- Serving Size: 1 slice
- Calories: 300
- Sugar: 25g
- Sodium: 200mg
- Fat: 12g
- Saturated Fat: 7g
- Unsaturated Fat: 4g
- Trans Fat: 0g
- Carbohydrates: 46g
- Fiber: 1g
- Protein: 3g
- Cholesterol: 15mg
Keywords: Fruity Pebbles, no-bake dessert, icebox cake, childhood favorite, easy dessert